User Guide
Get the most out of Kakei AI
01
Quick Start
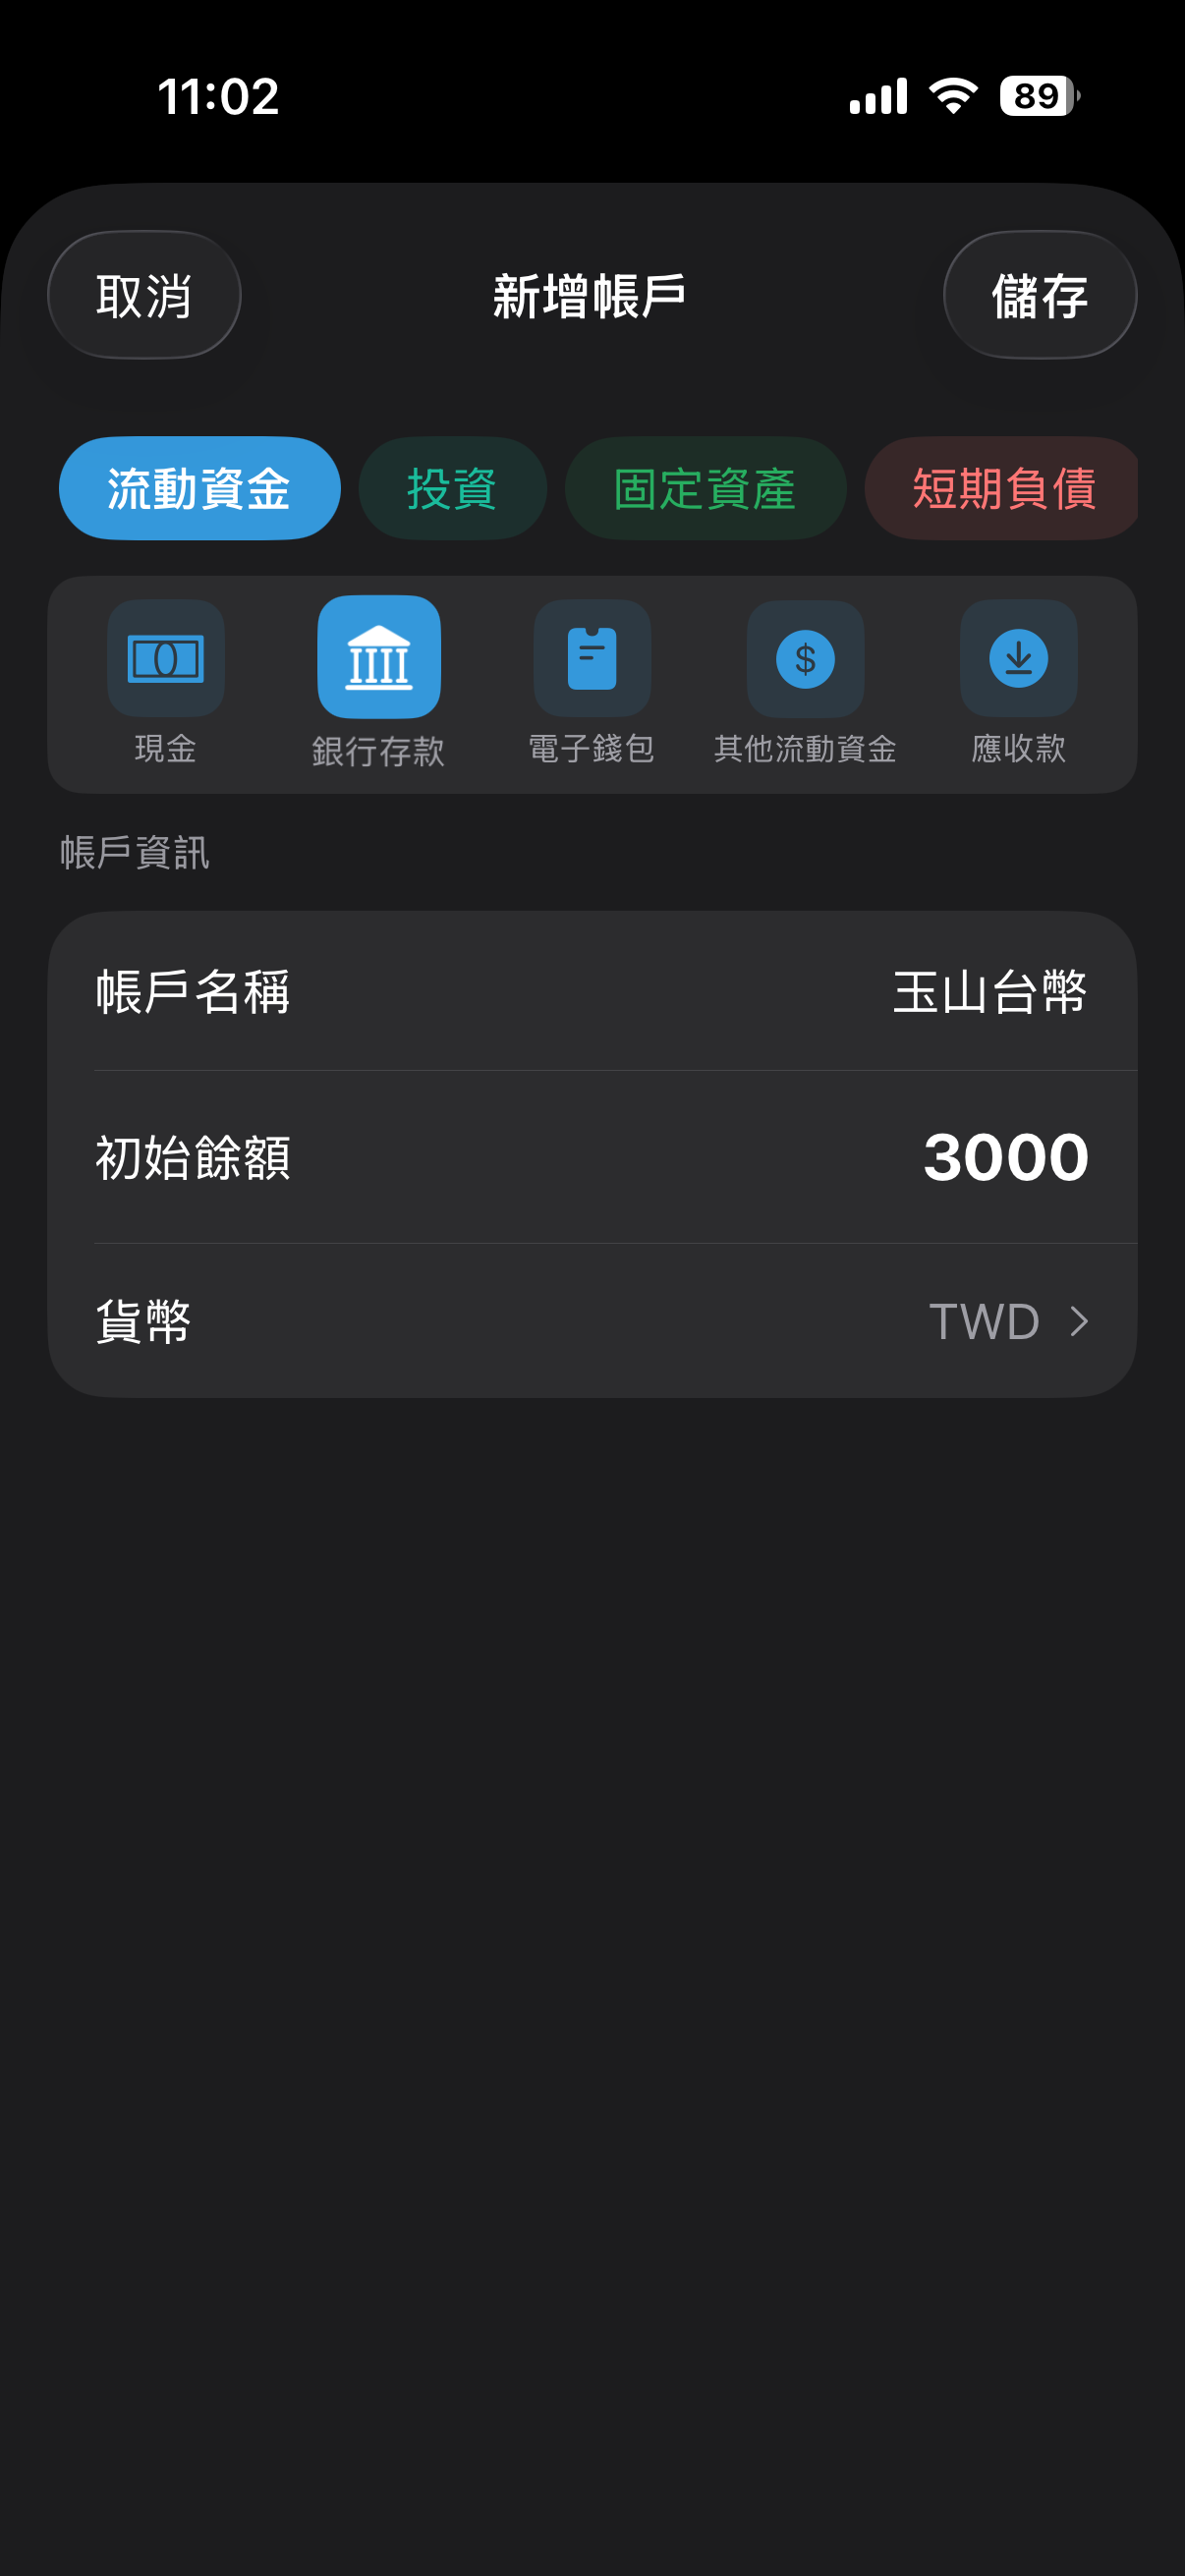
Create a bank account under Accounts and enter last month's opening balance
Screenshot last month's bank statement and share it to Kakei AI
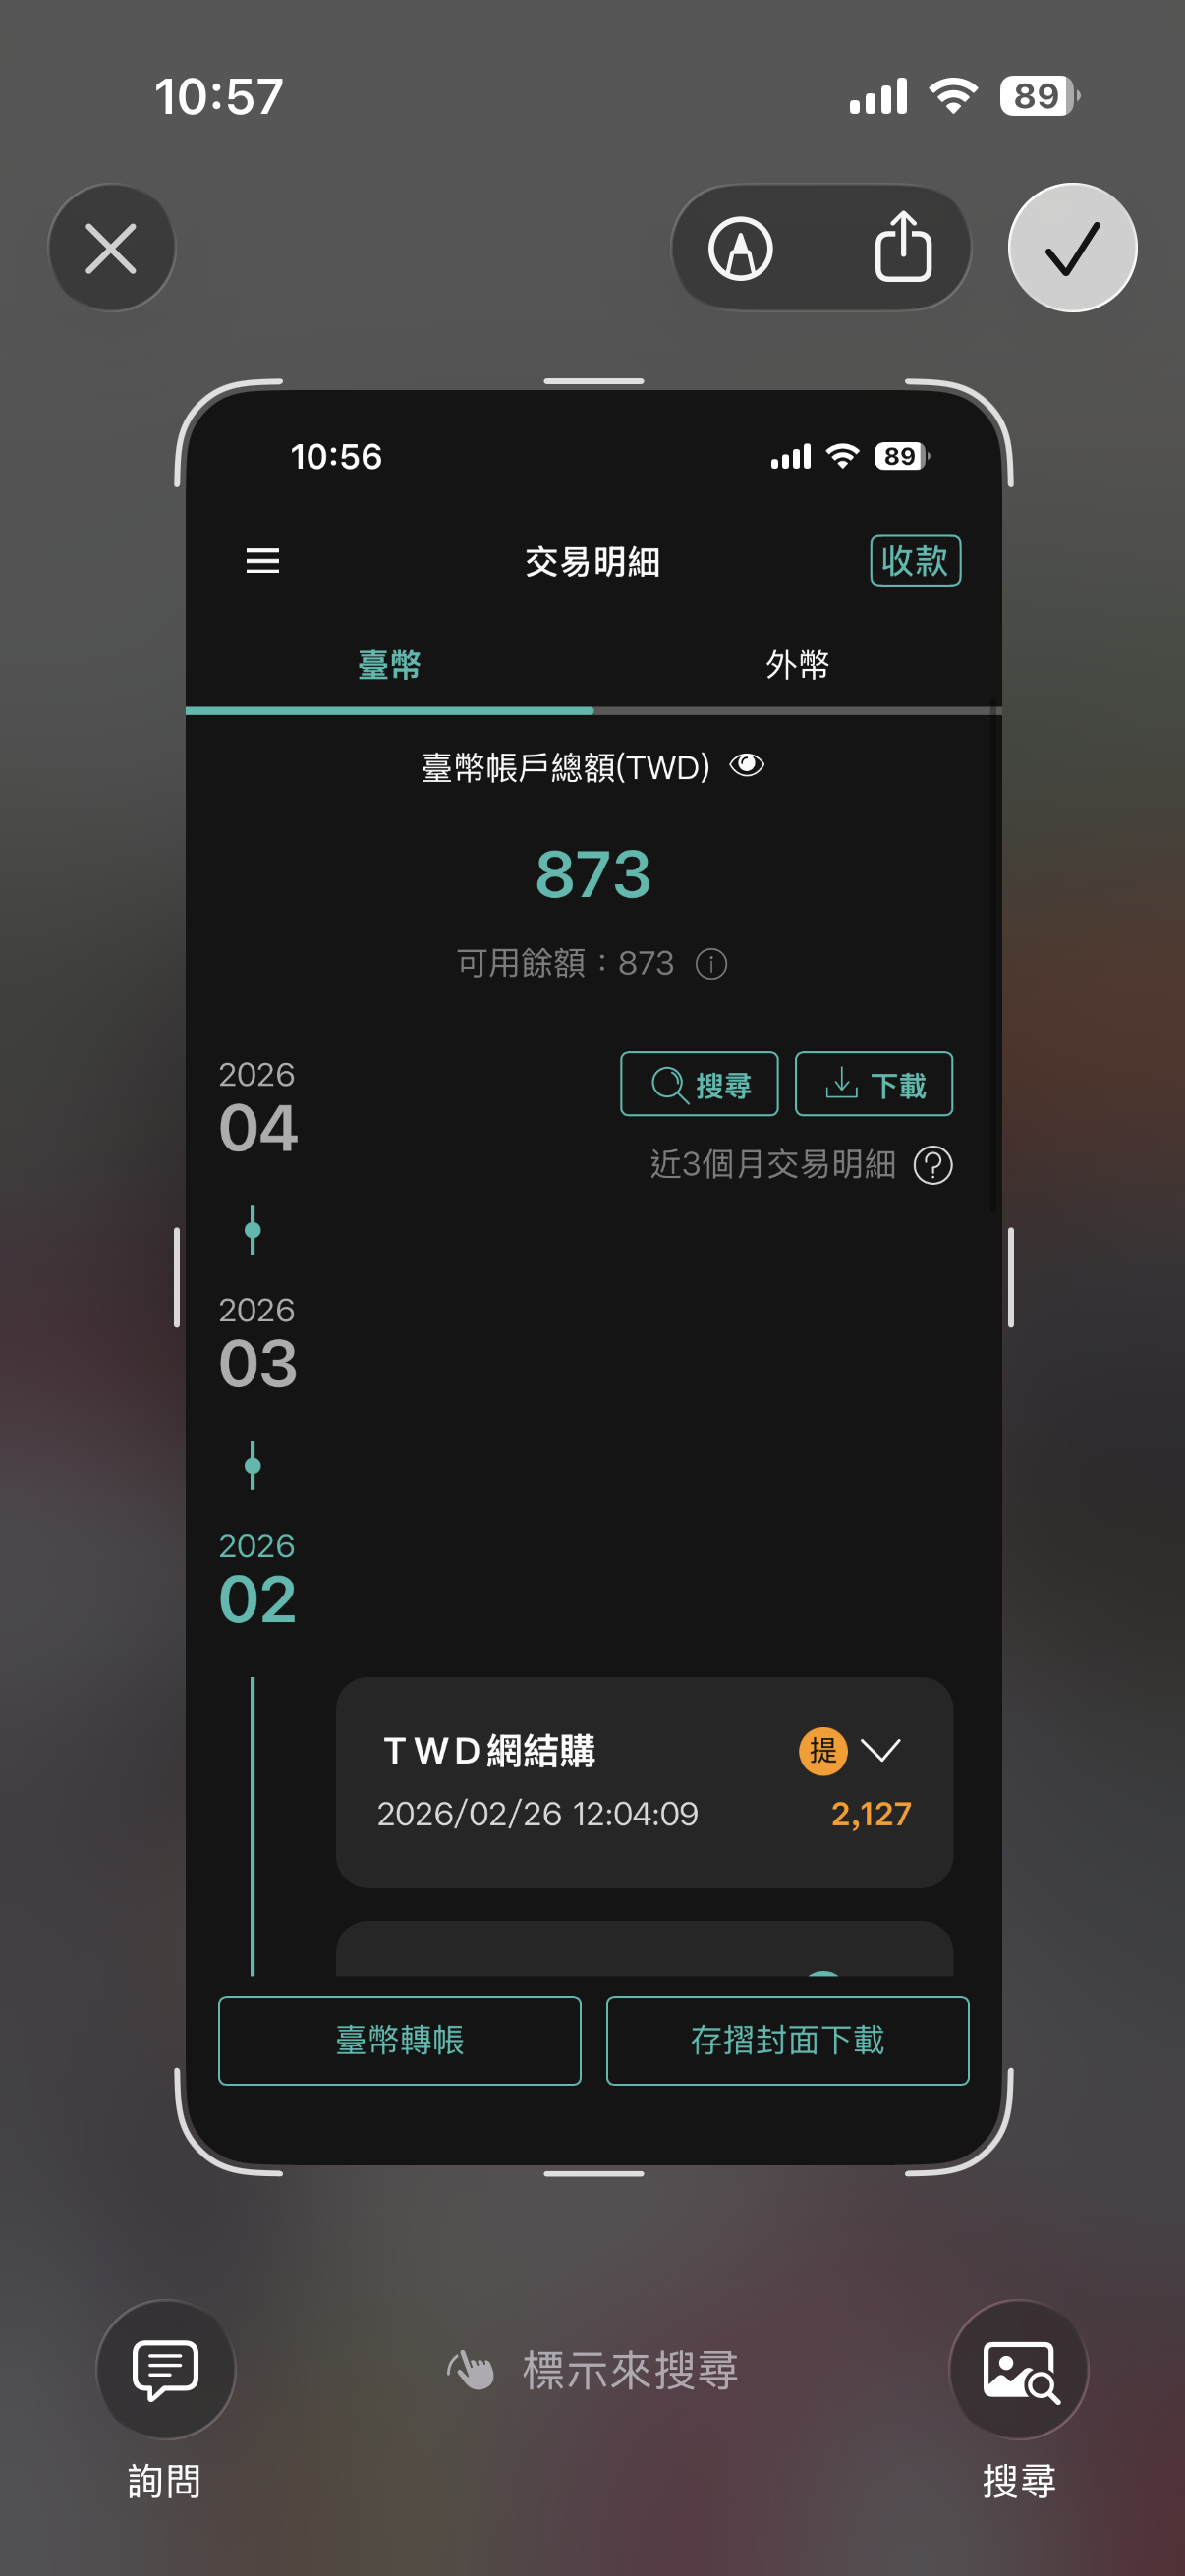
Open your bank app, screenshot last month’s transactions, then share directly to Kakei AI before opening the app.
Tip: sharing doesn’t save to your photo album, and you can share multiple screenshots before opening the app — AI processes them while you do other things.
Confirm each entry, import to the account, and verify the balance
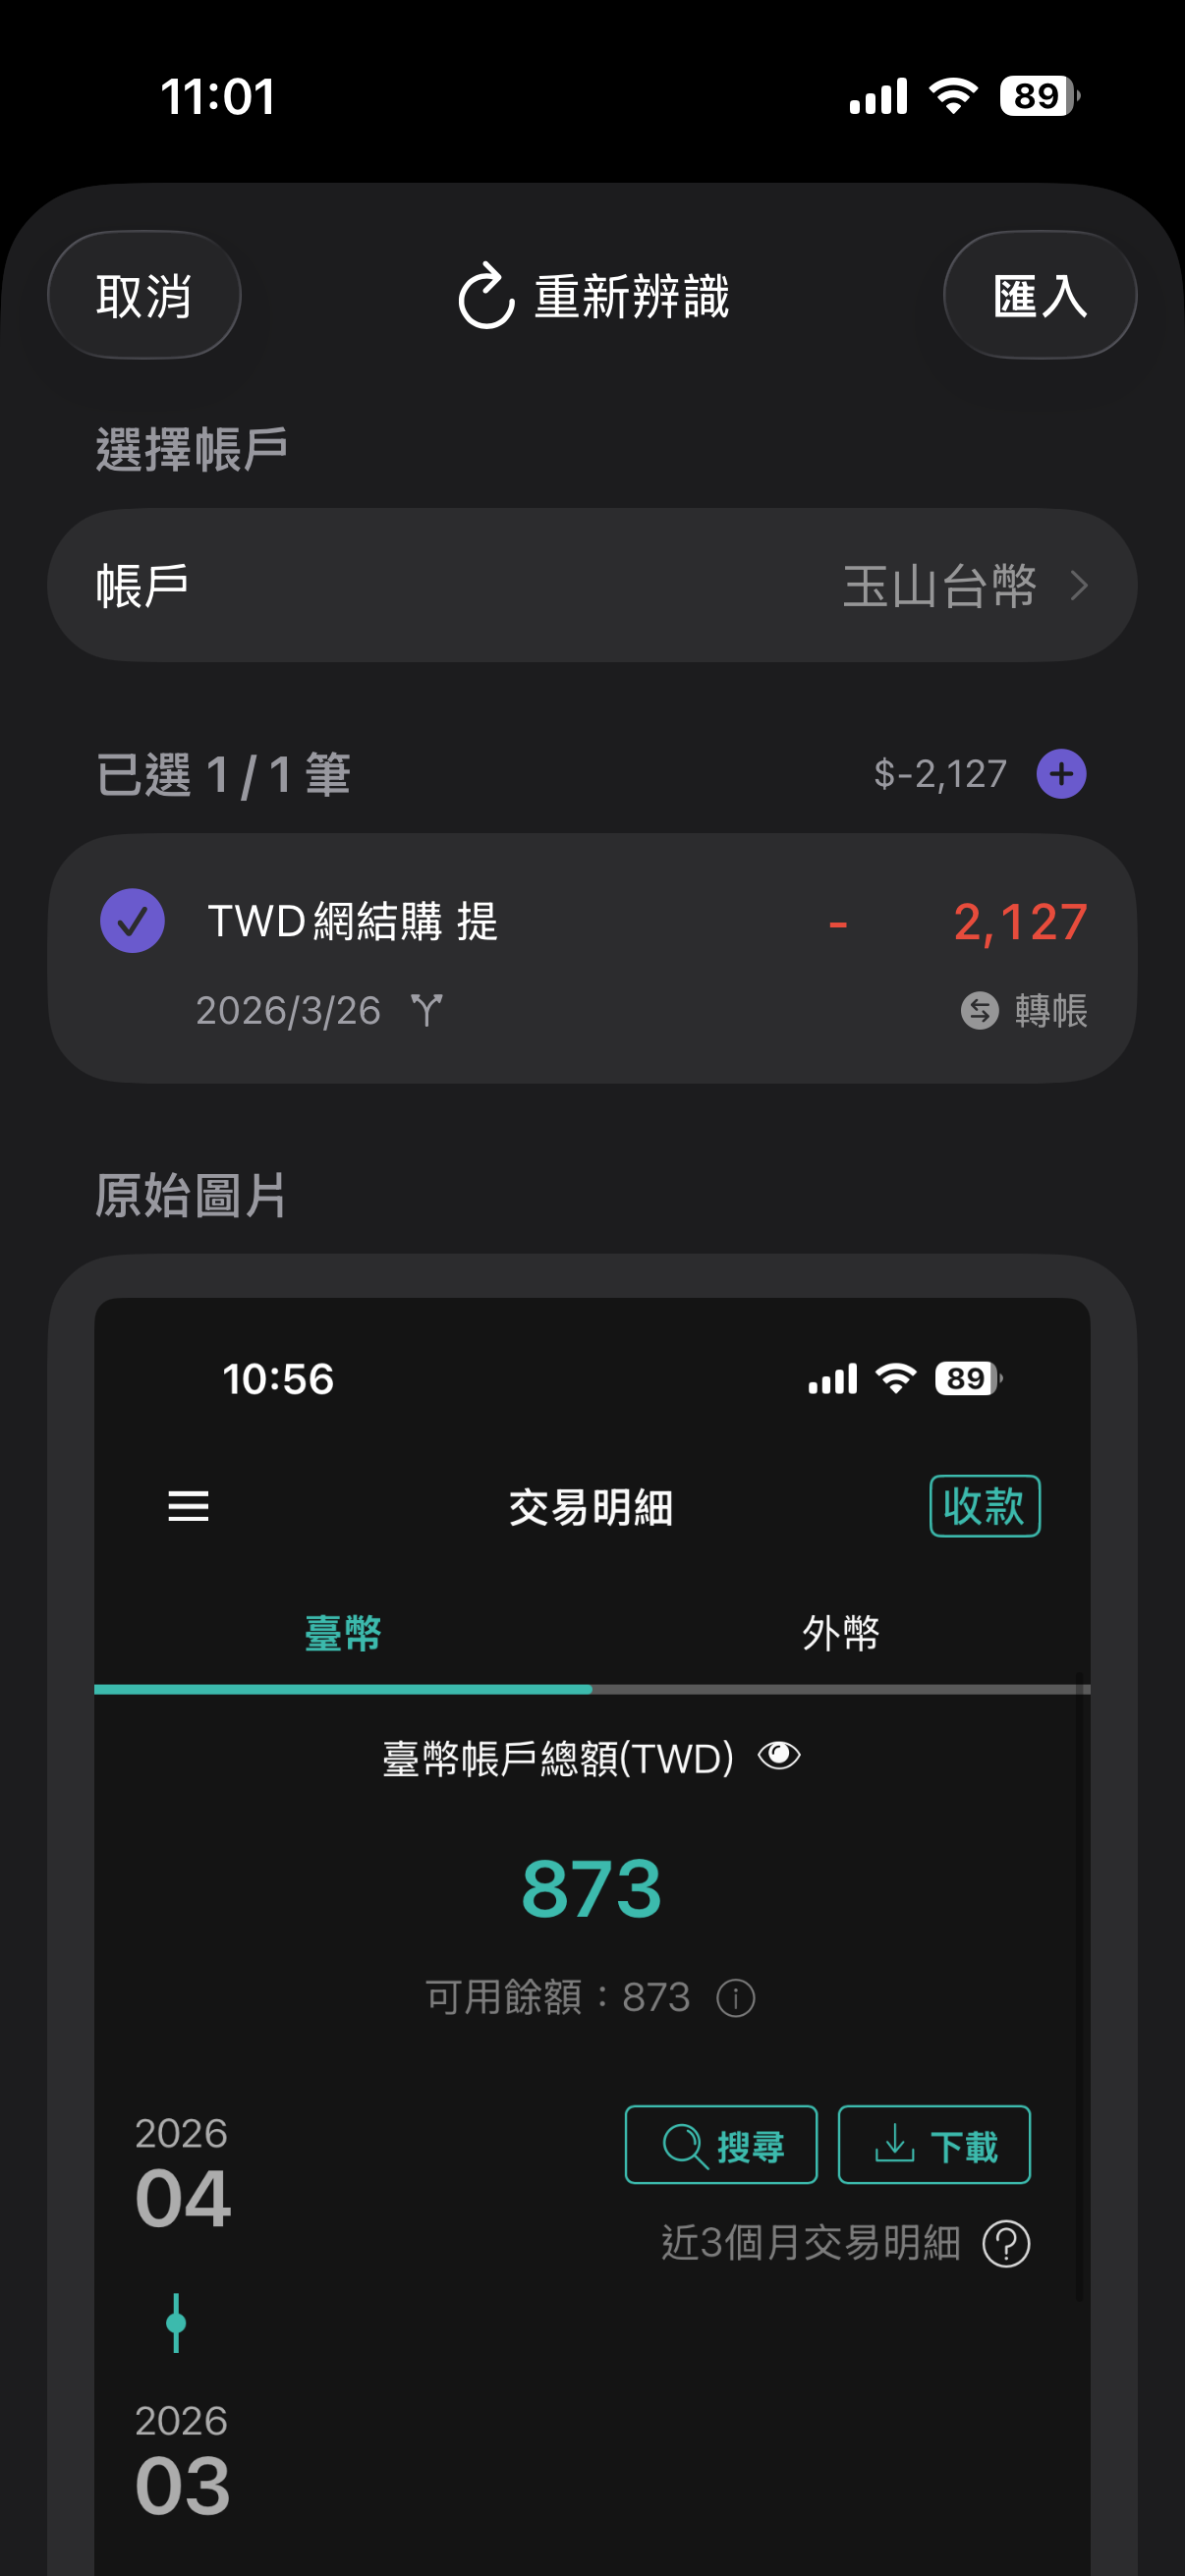
Mark each entry as income, expense, or transfer (a move between your own accounts — not counted as income or expense). Once confirmed, import into the bank account you just created and verify the balance matches your bank app’s end-of-month balance.
02
How You Can Use It
Pick the flow that fits your style
The Monthly Recap Type
Spend a few minutes at month-end — big picture only
Screenshot your bank statements each month
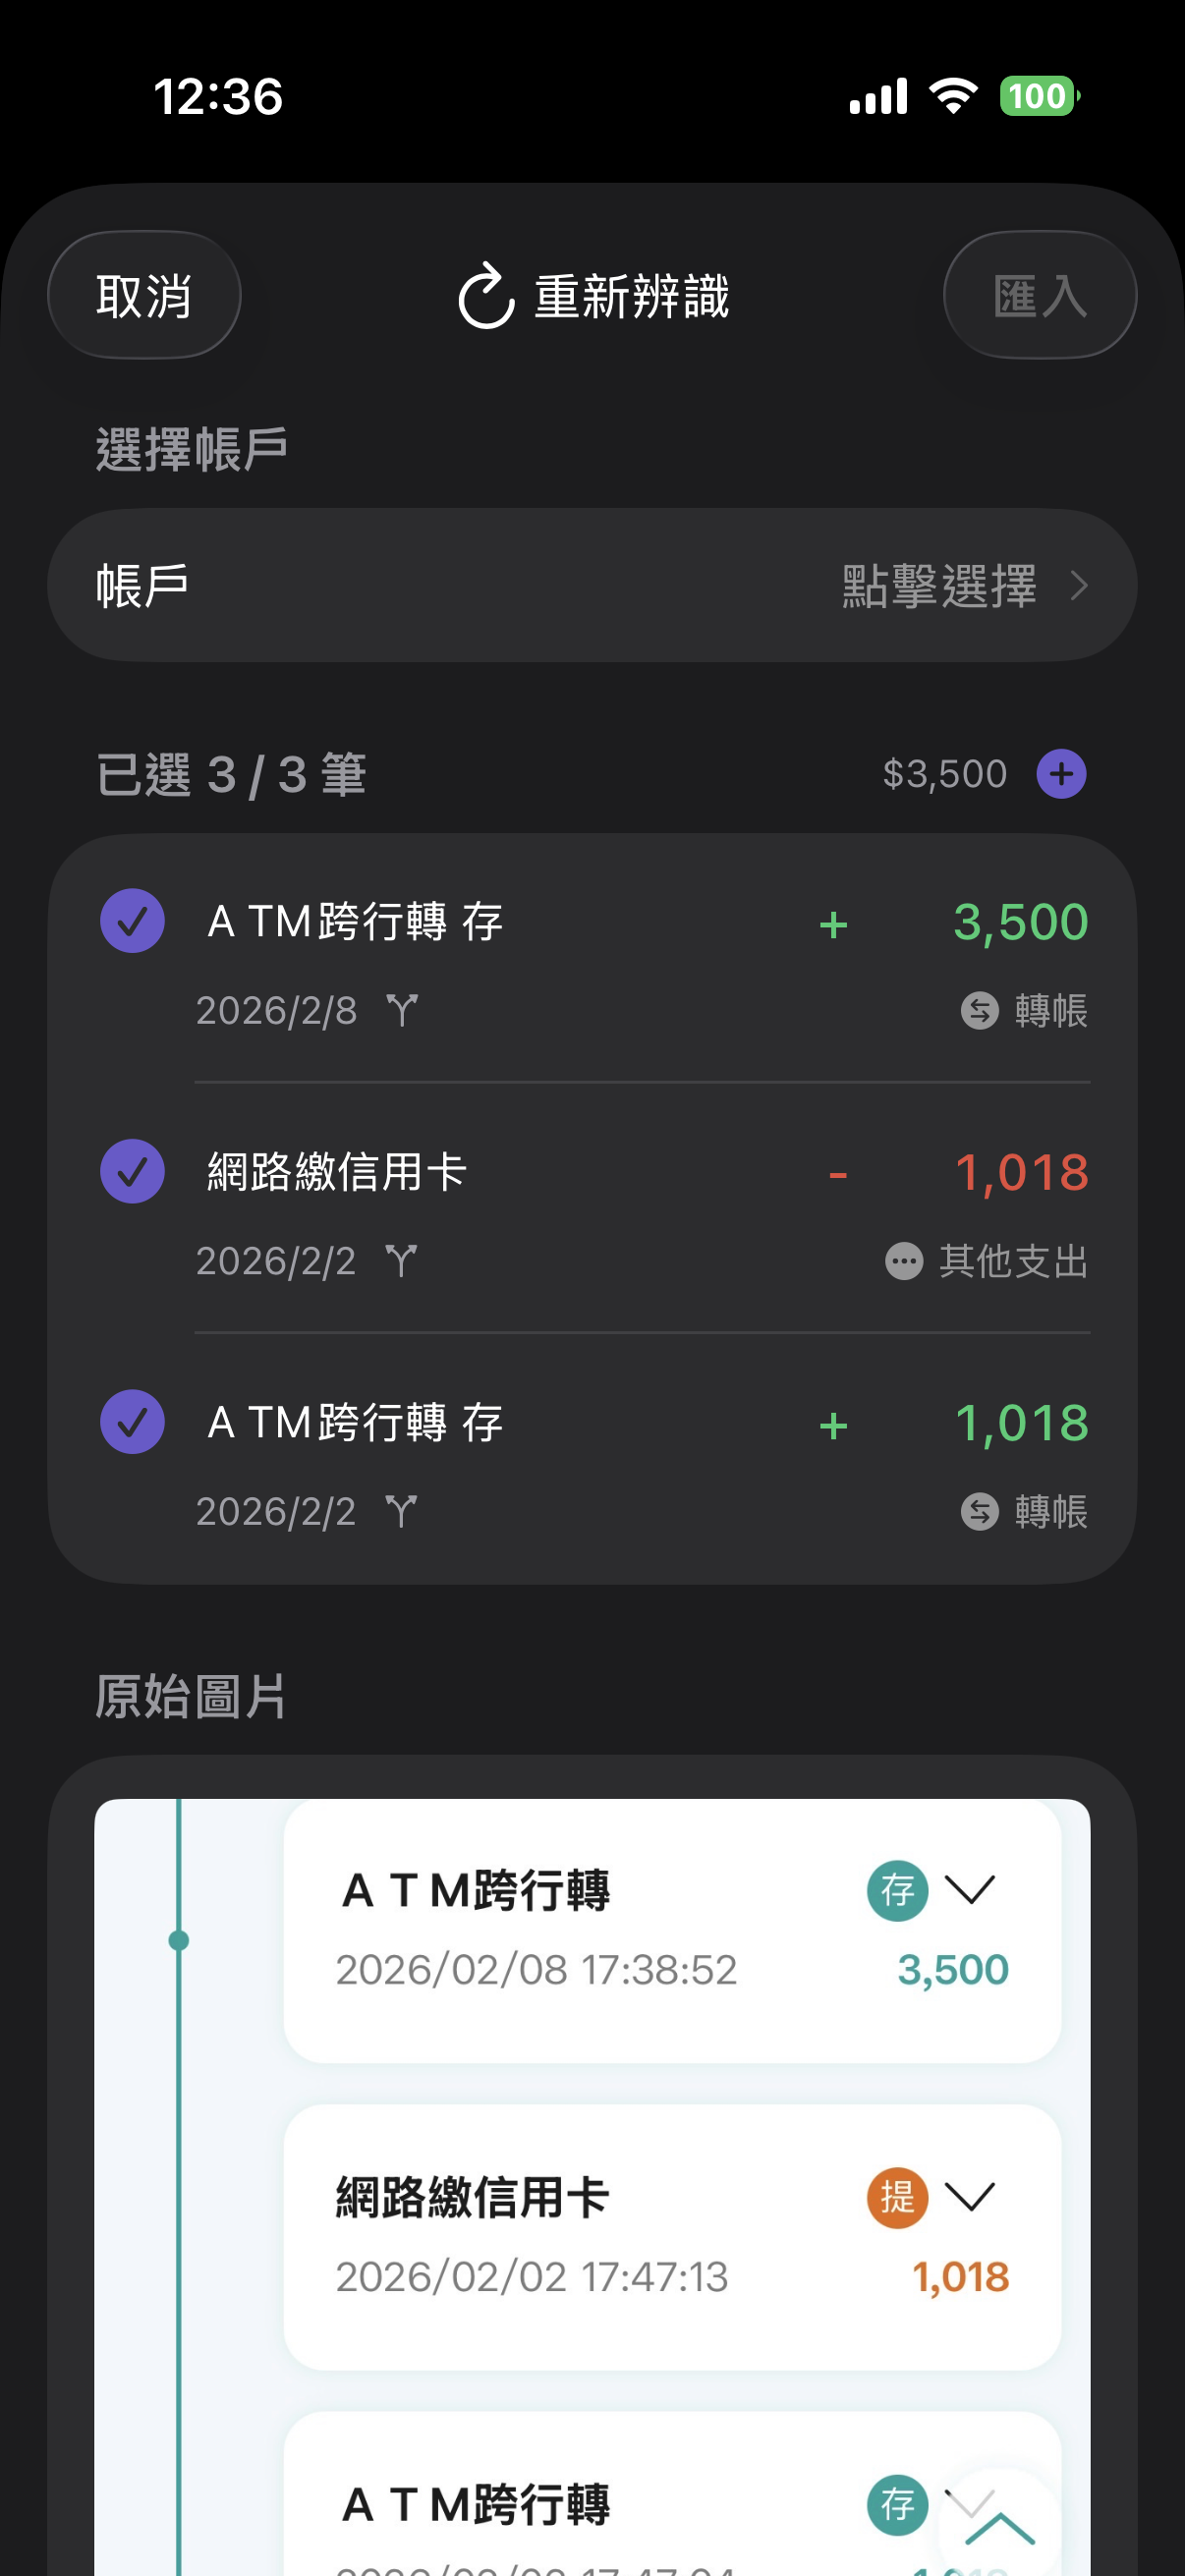
Drop your bank’s monthly transaction history screenshots into the app for batch processing.
For each transaction, confirm whether it’s a real income / expense, or a transfer to another account you own (mark those as transfers, not expenses). Credit card payments can simply be recorded as other expenses — no need to track the card detail separately.
The Detail Tracker Type
Add credit card statements on top of bank accounts for full accuracy
Screenshot your bank statements each month
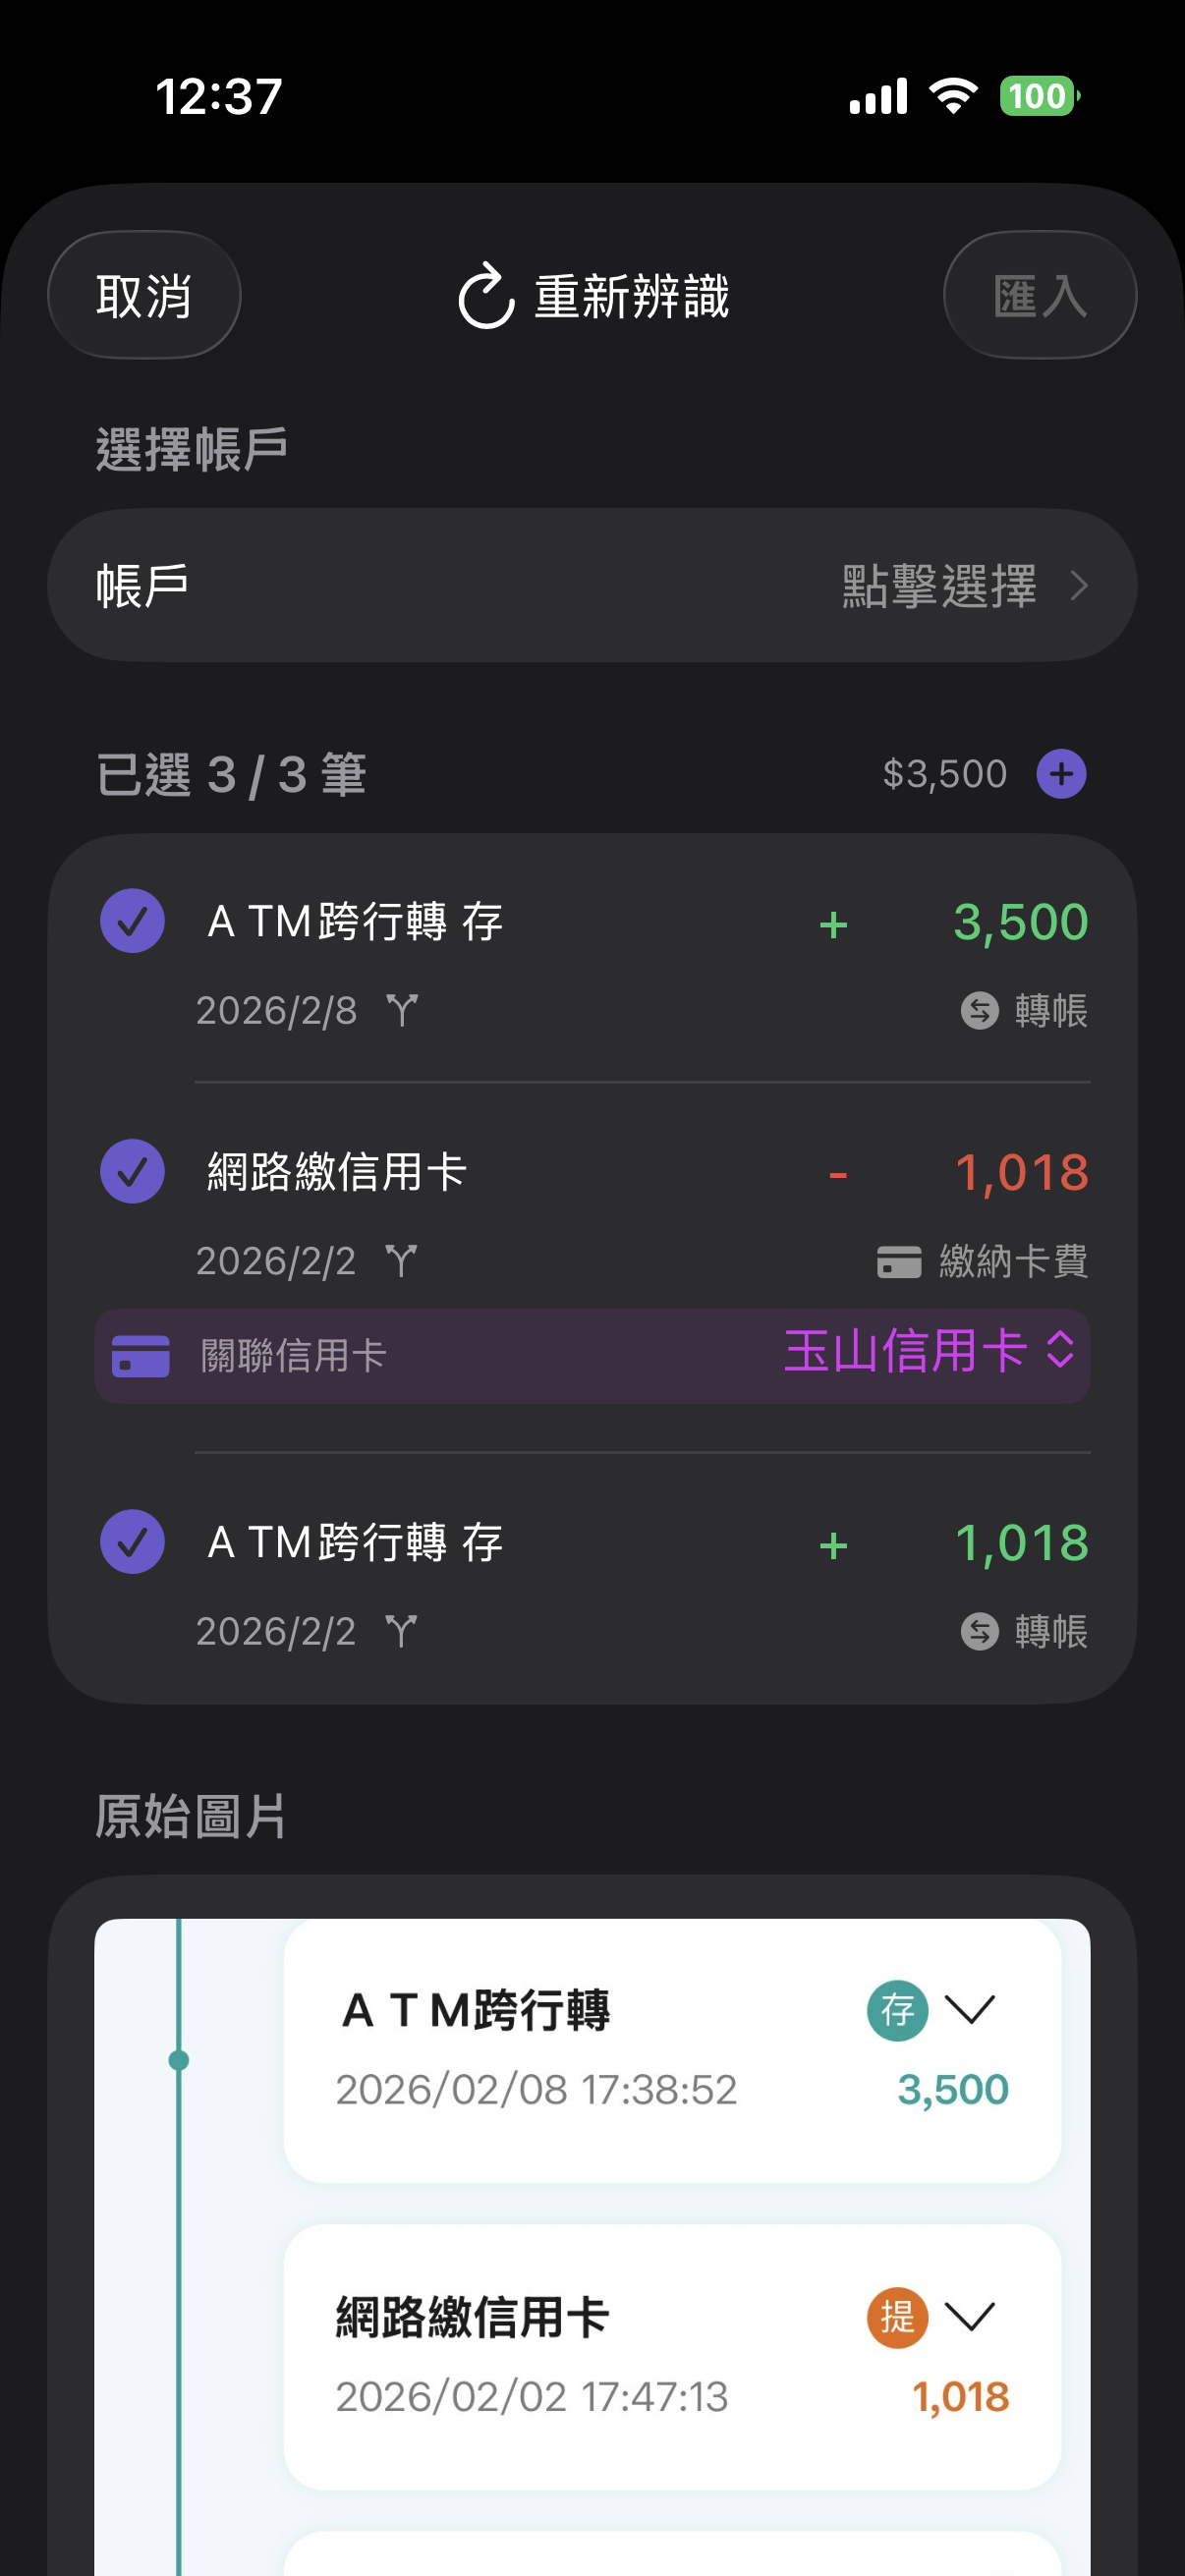
Import each bank account’s monthly statements. AI auto-categorizes. Confirm whether each entry is income / expense or a transfer to another account you own.
Credit card payment → record as a transfer
The credit card payment shown in your bank statement should be recorded as a transfer to your credit card account — not as an expense.
Screenshot your credit card statement, verify balance is zero
Import your credit card’s monthly statement. AI categorizes each purchase. Verify categories are correct — the final credit card account balance should be 0 (fully paid).
03
Improve Recognition & Accuracy
Switch the AI model in Settings
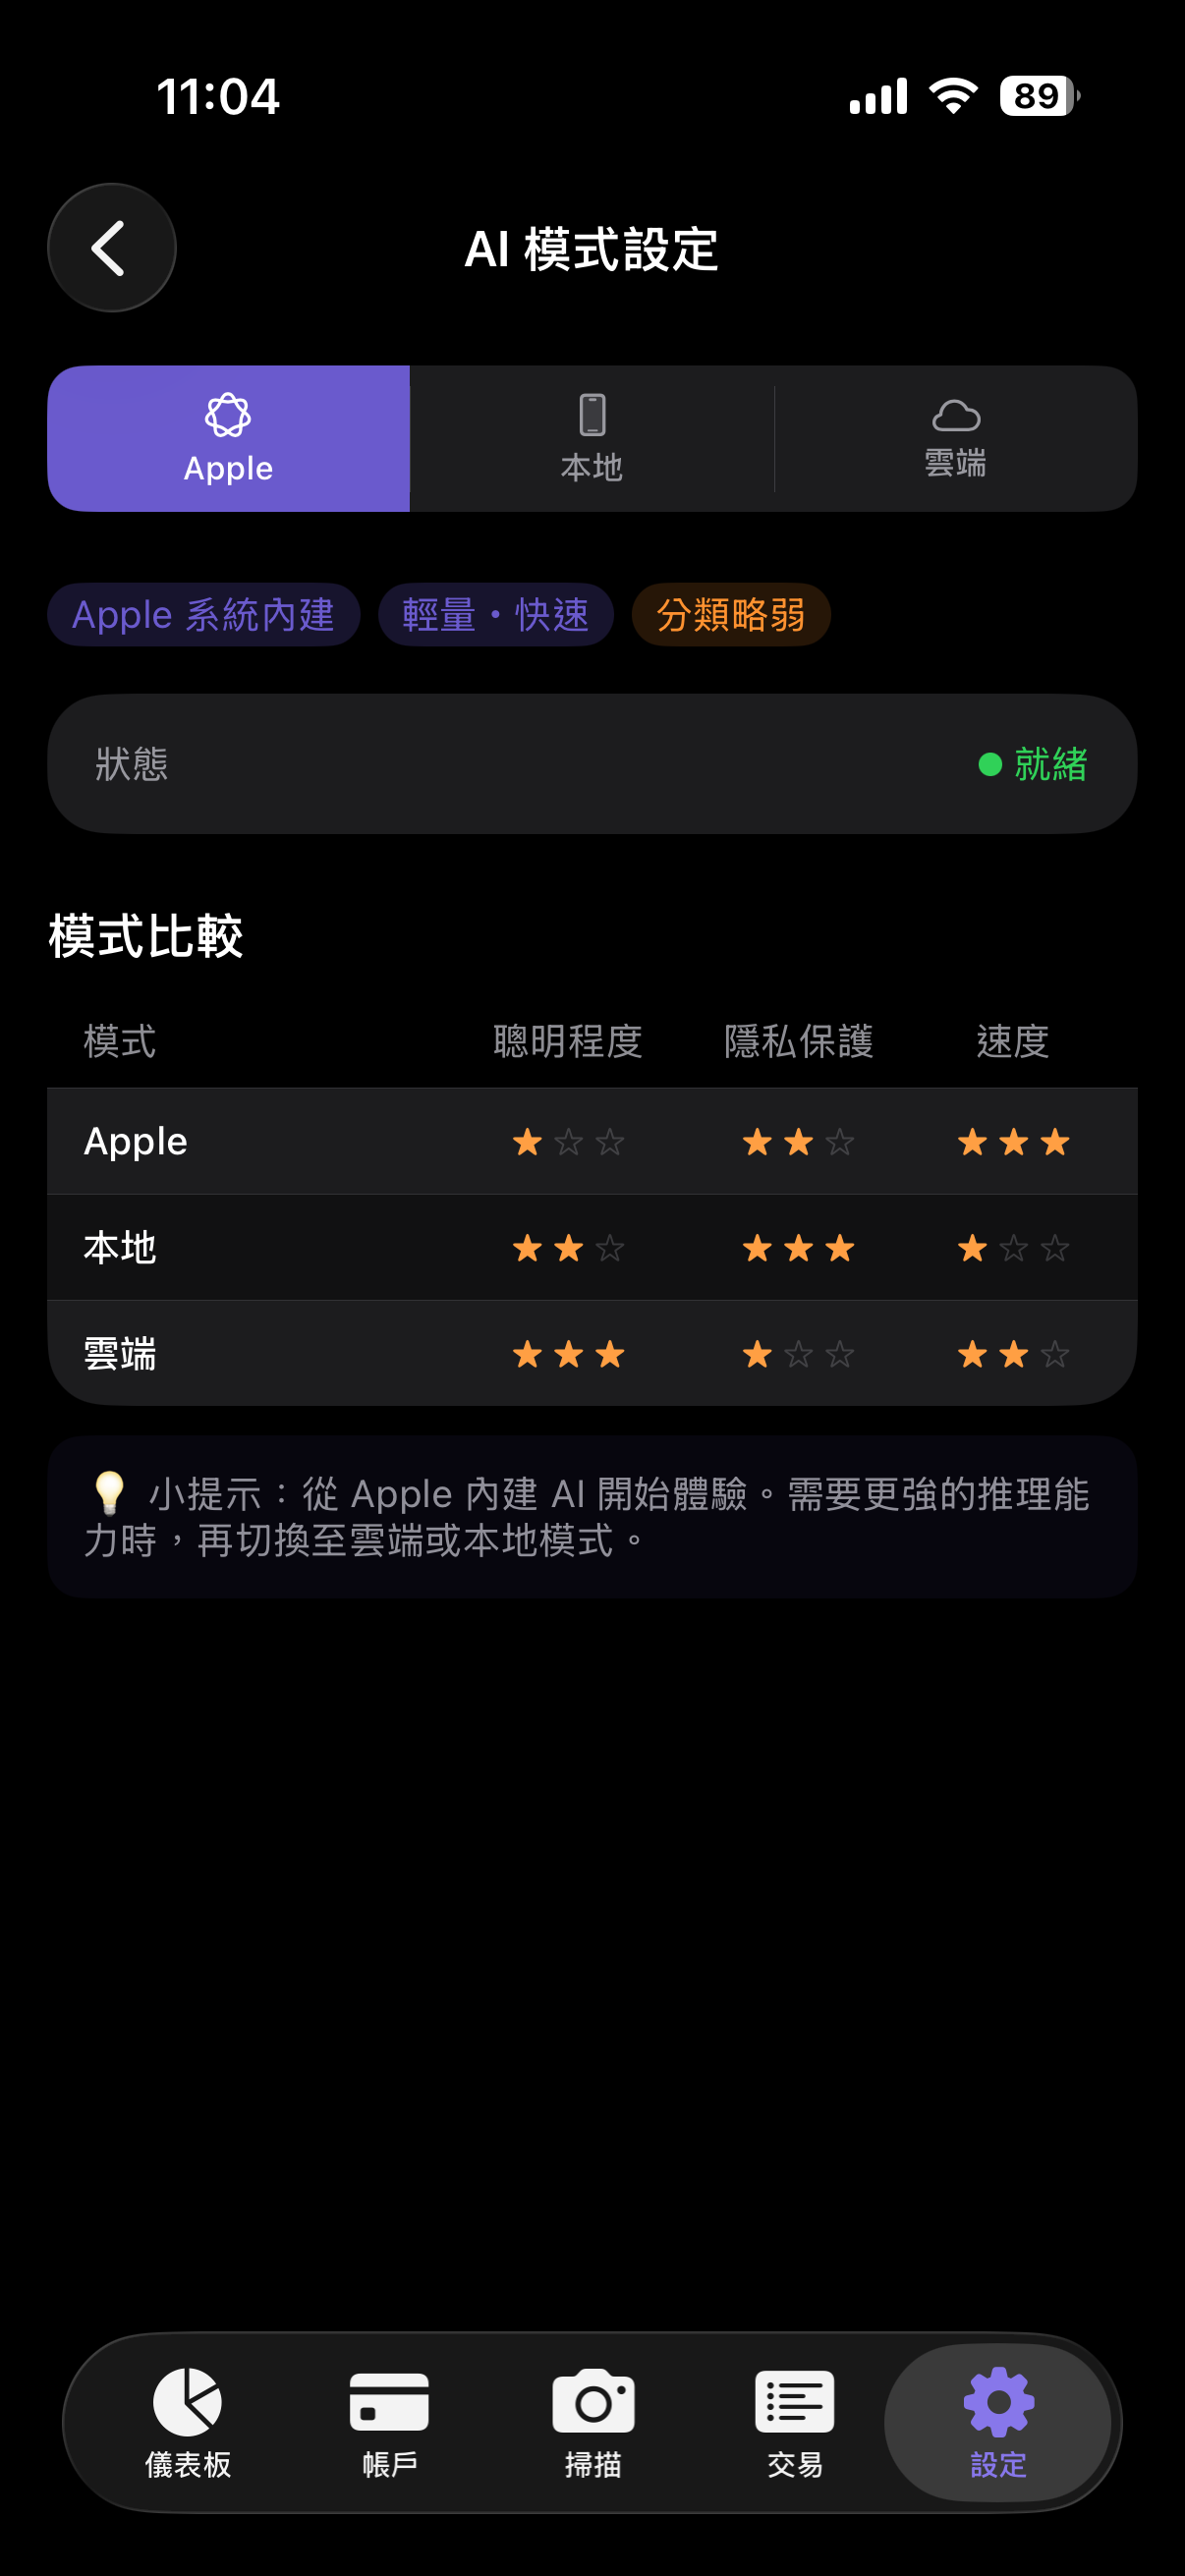
Go to Settings in the app to switch the AI model. On-device and cloud models typically outperform Apple’s native AI for financial recognition.
Screenshot only rows with transactions to avoid missed entries
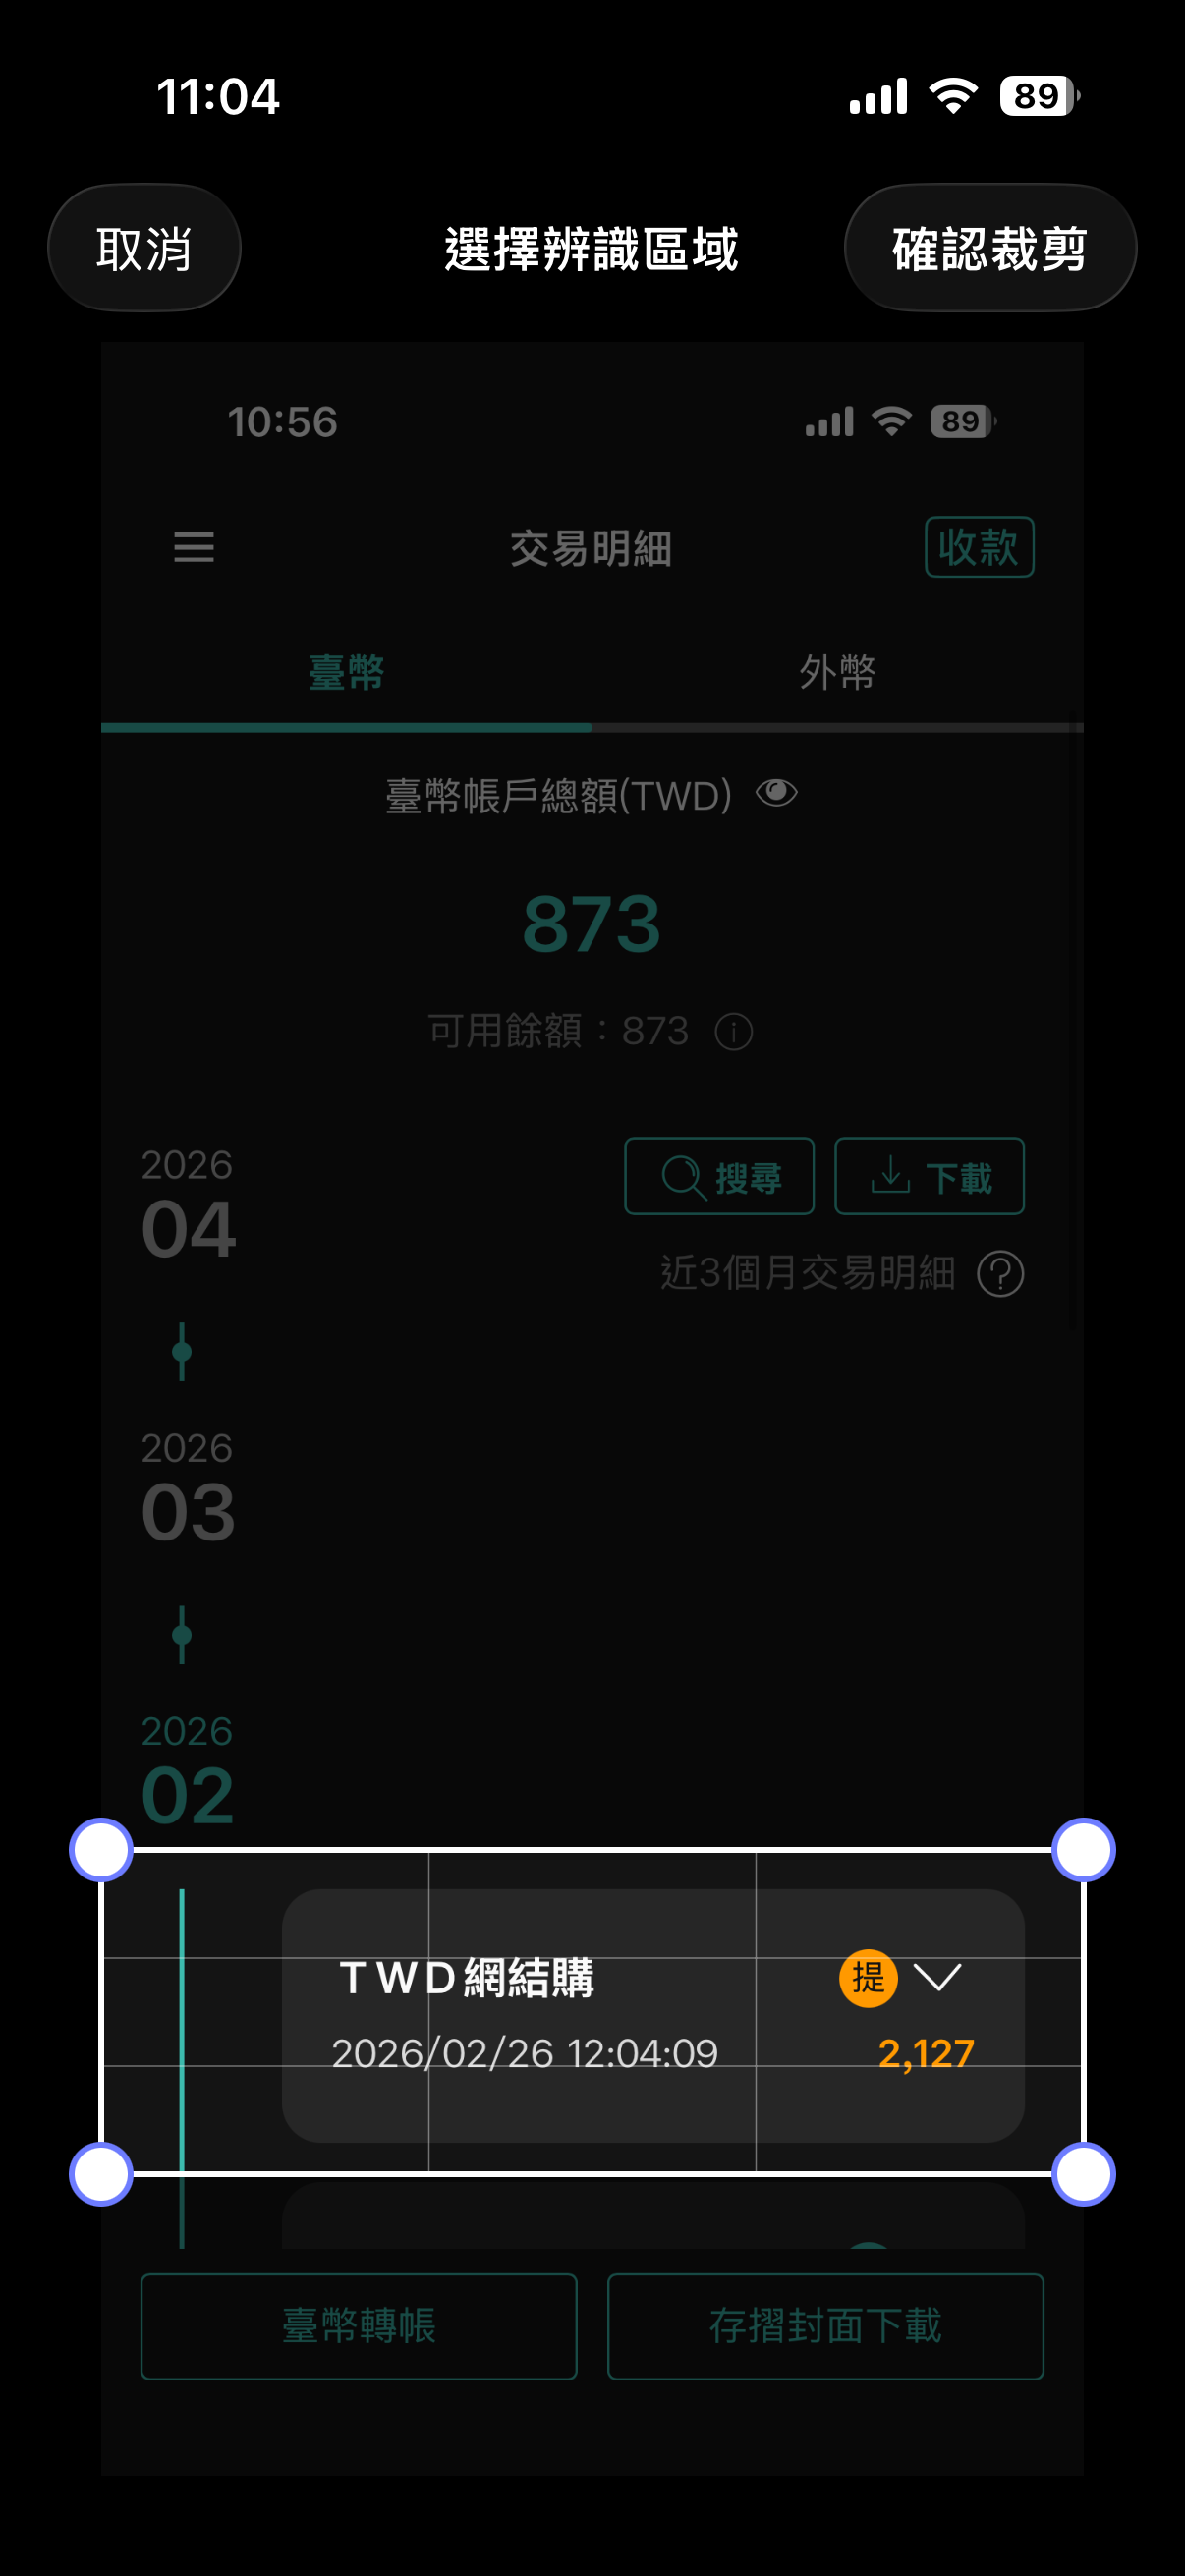
If entries are being missed, screenshot only the section that contains transactions — recognition is faster and more accurate:
- Crop the selection when taking the screenshot before sharing
- After recognition, use Re-select Recognition Area to adjust
Include the month header in your screenshot
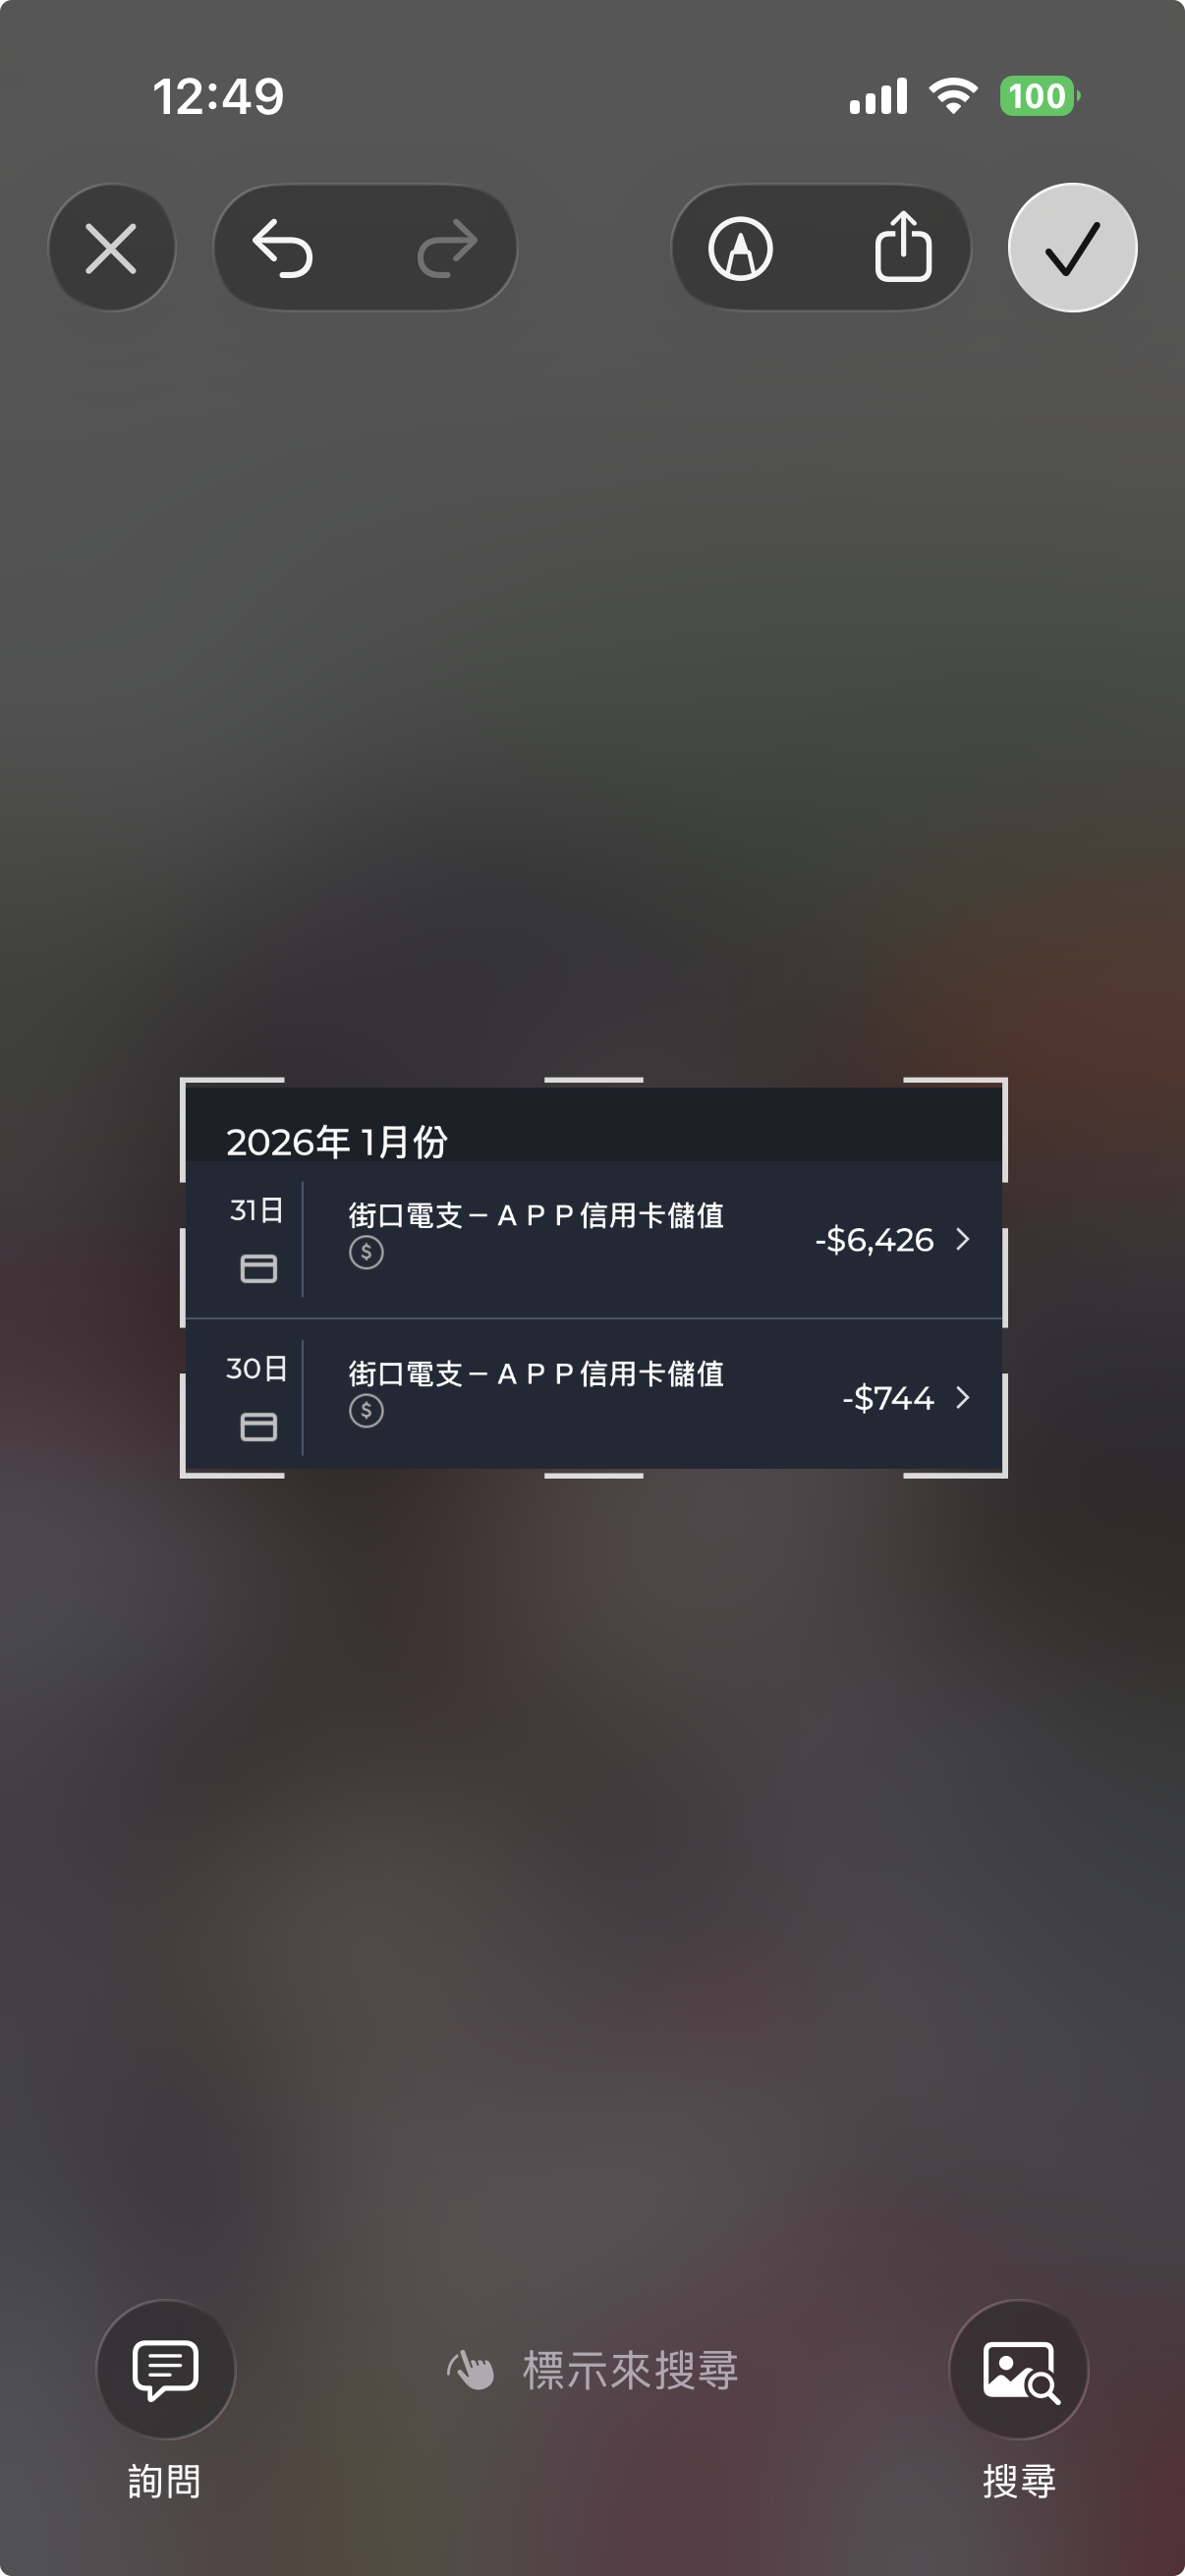
If each transaction only shows a day number without the month, try to include the area above it that shows the month.
If that’s not possible, you may need to adjust the date manually.
Correct a category — it'll be remembered next time
If a category looks wrong, correct it manually. Tap Re-recognize or simply wait — the next time the same memo appears, it will be automatically filed into the category you set.
04
Use Cases
Accounts Receivable
Group meals, business trips, overseas purchases — keep fronted amounts out of your expenses until you're paid back.
Use the split tag on your card charge
For the full meal charge on your card, apply a split tagto indicate it’s being divided among multiple people.
Set the number of shares
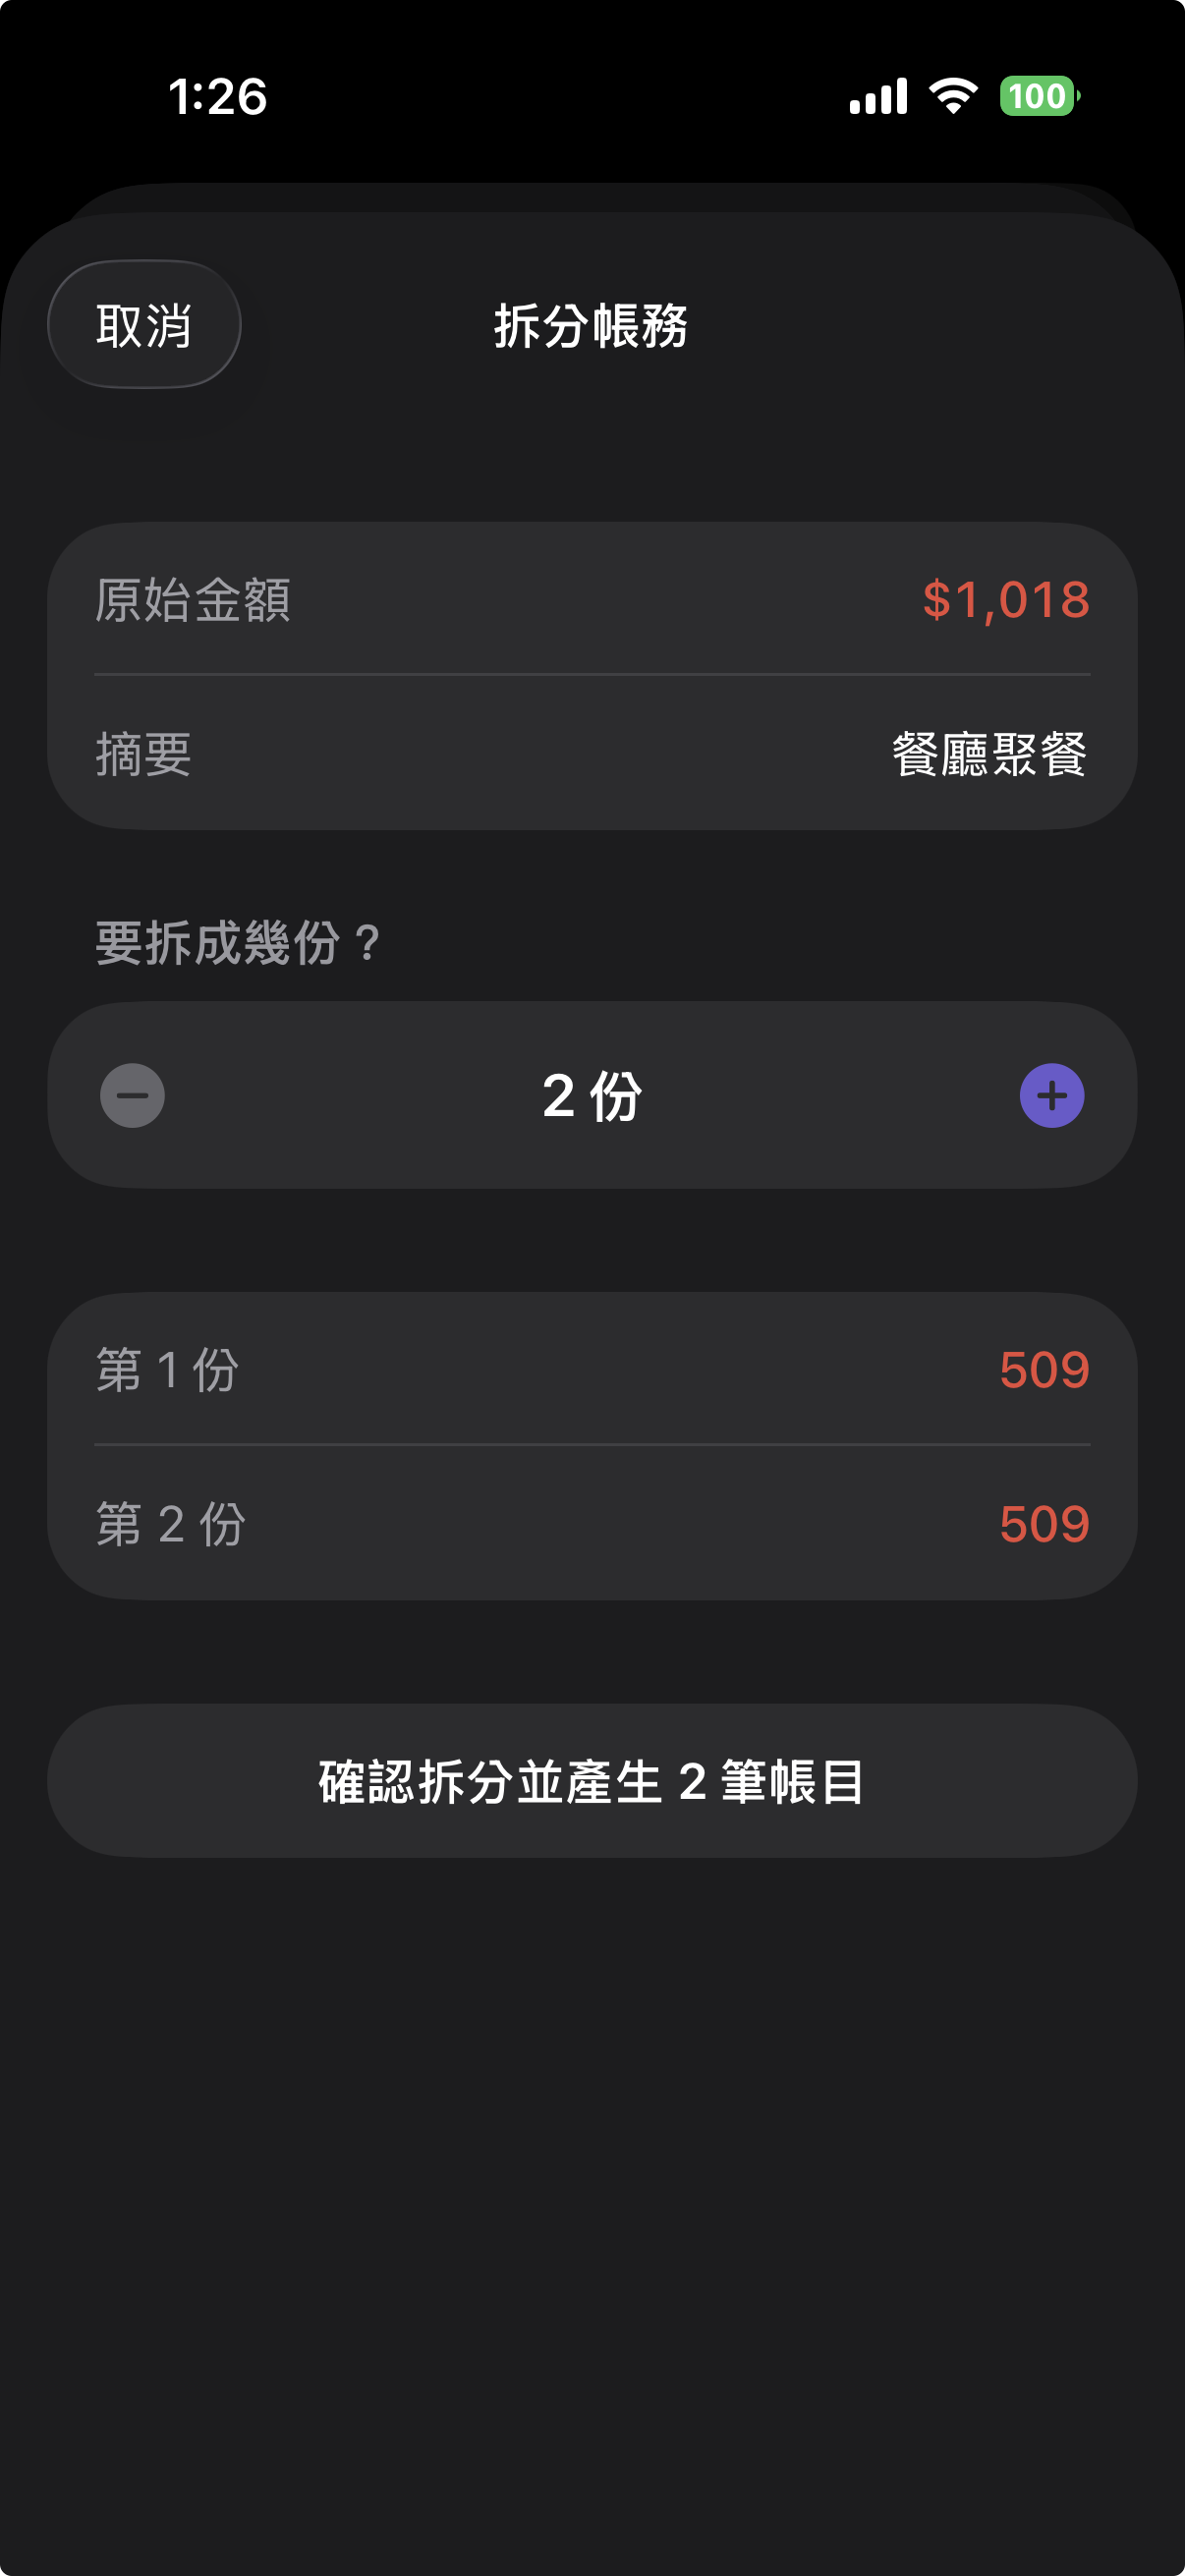
Specify how many ways to split — the app calculates each person’s share automatically.
Mark the portions others owe as 'on behalf of'
The portions covering others’ shares get tagged as on behalf of, added to your receivables for tracking.
Create a 'Business Trip' receivable account
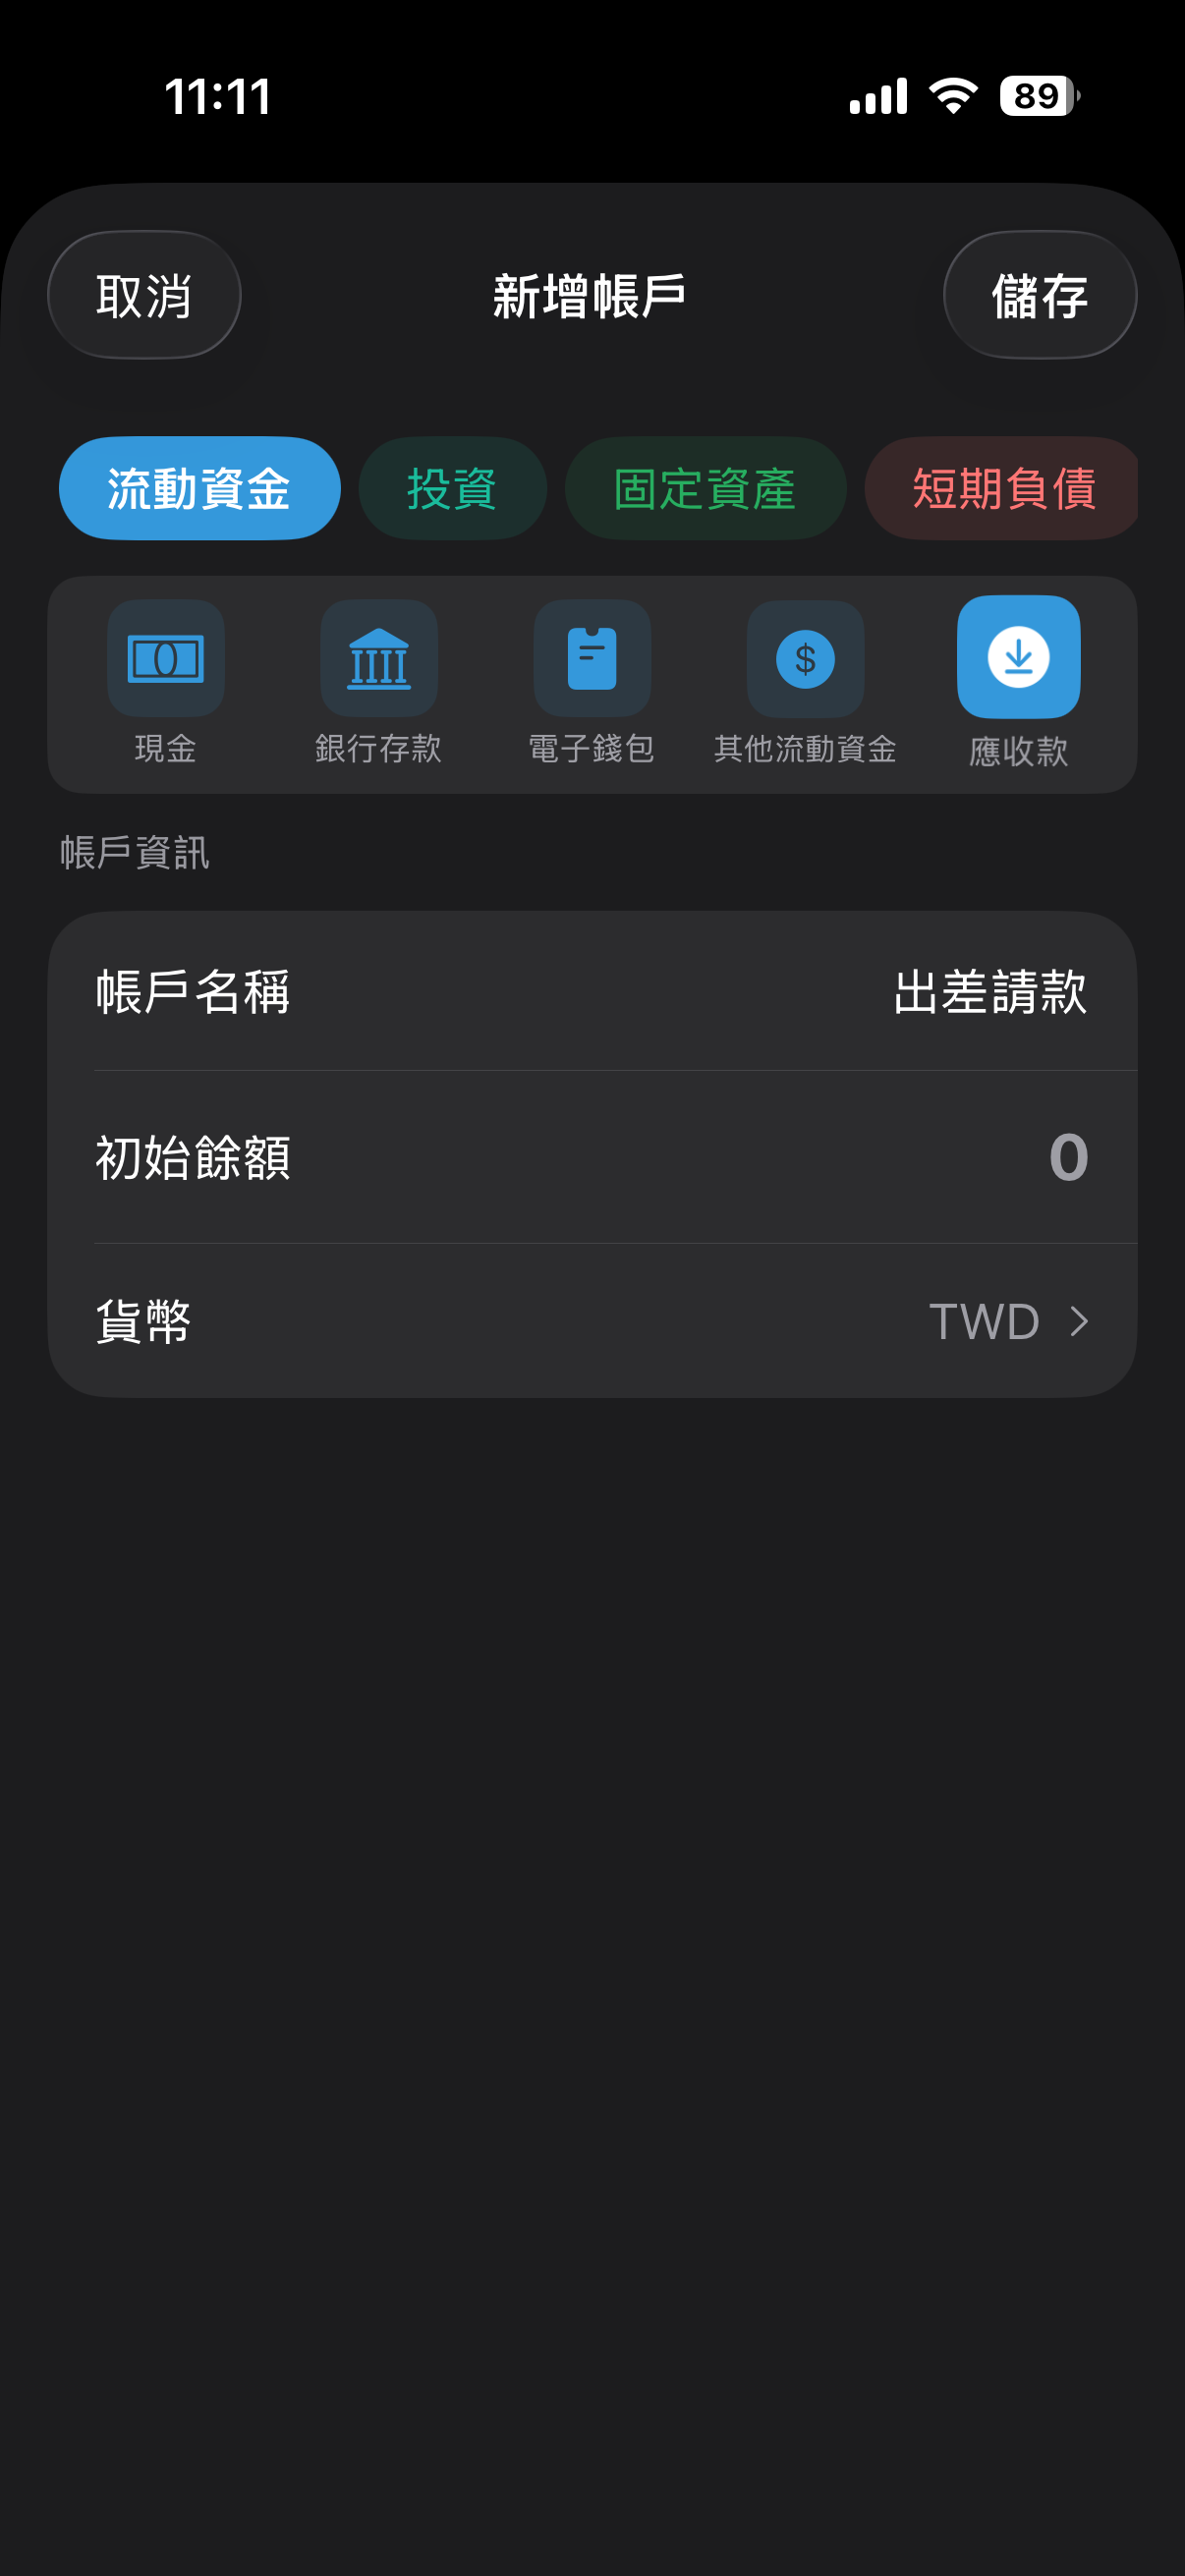
Add an accounts receivable account named “Business Trip Expenses.”
Tag trip expenses as 'on behalf of'
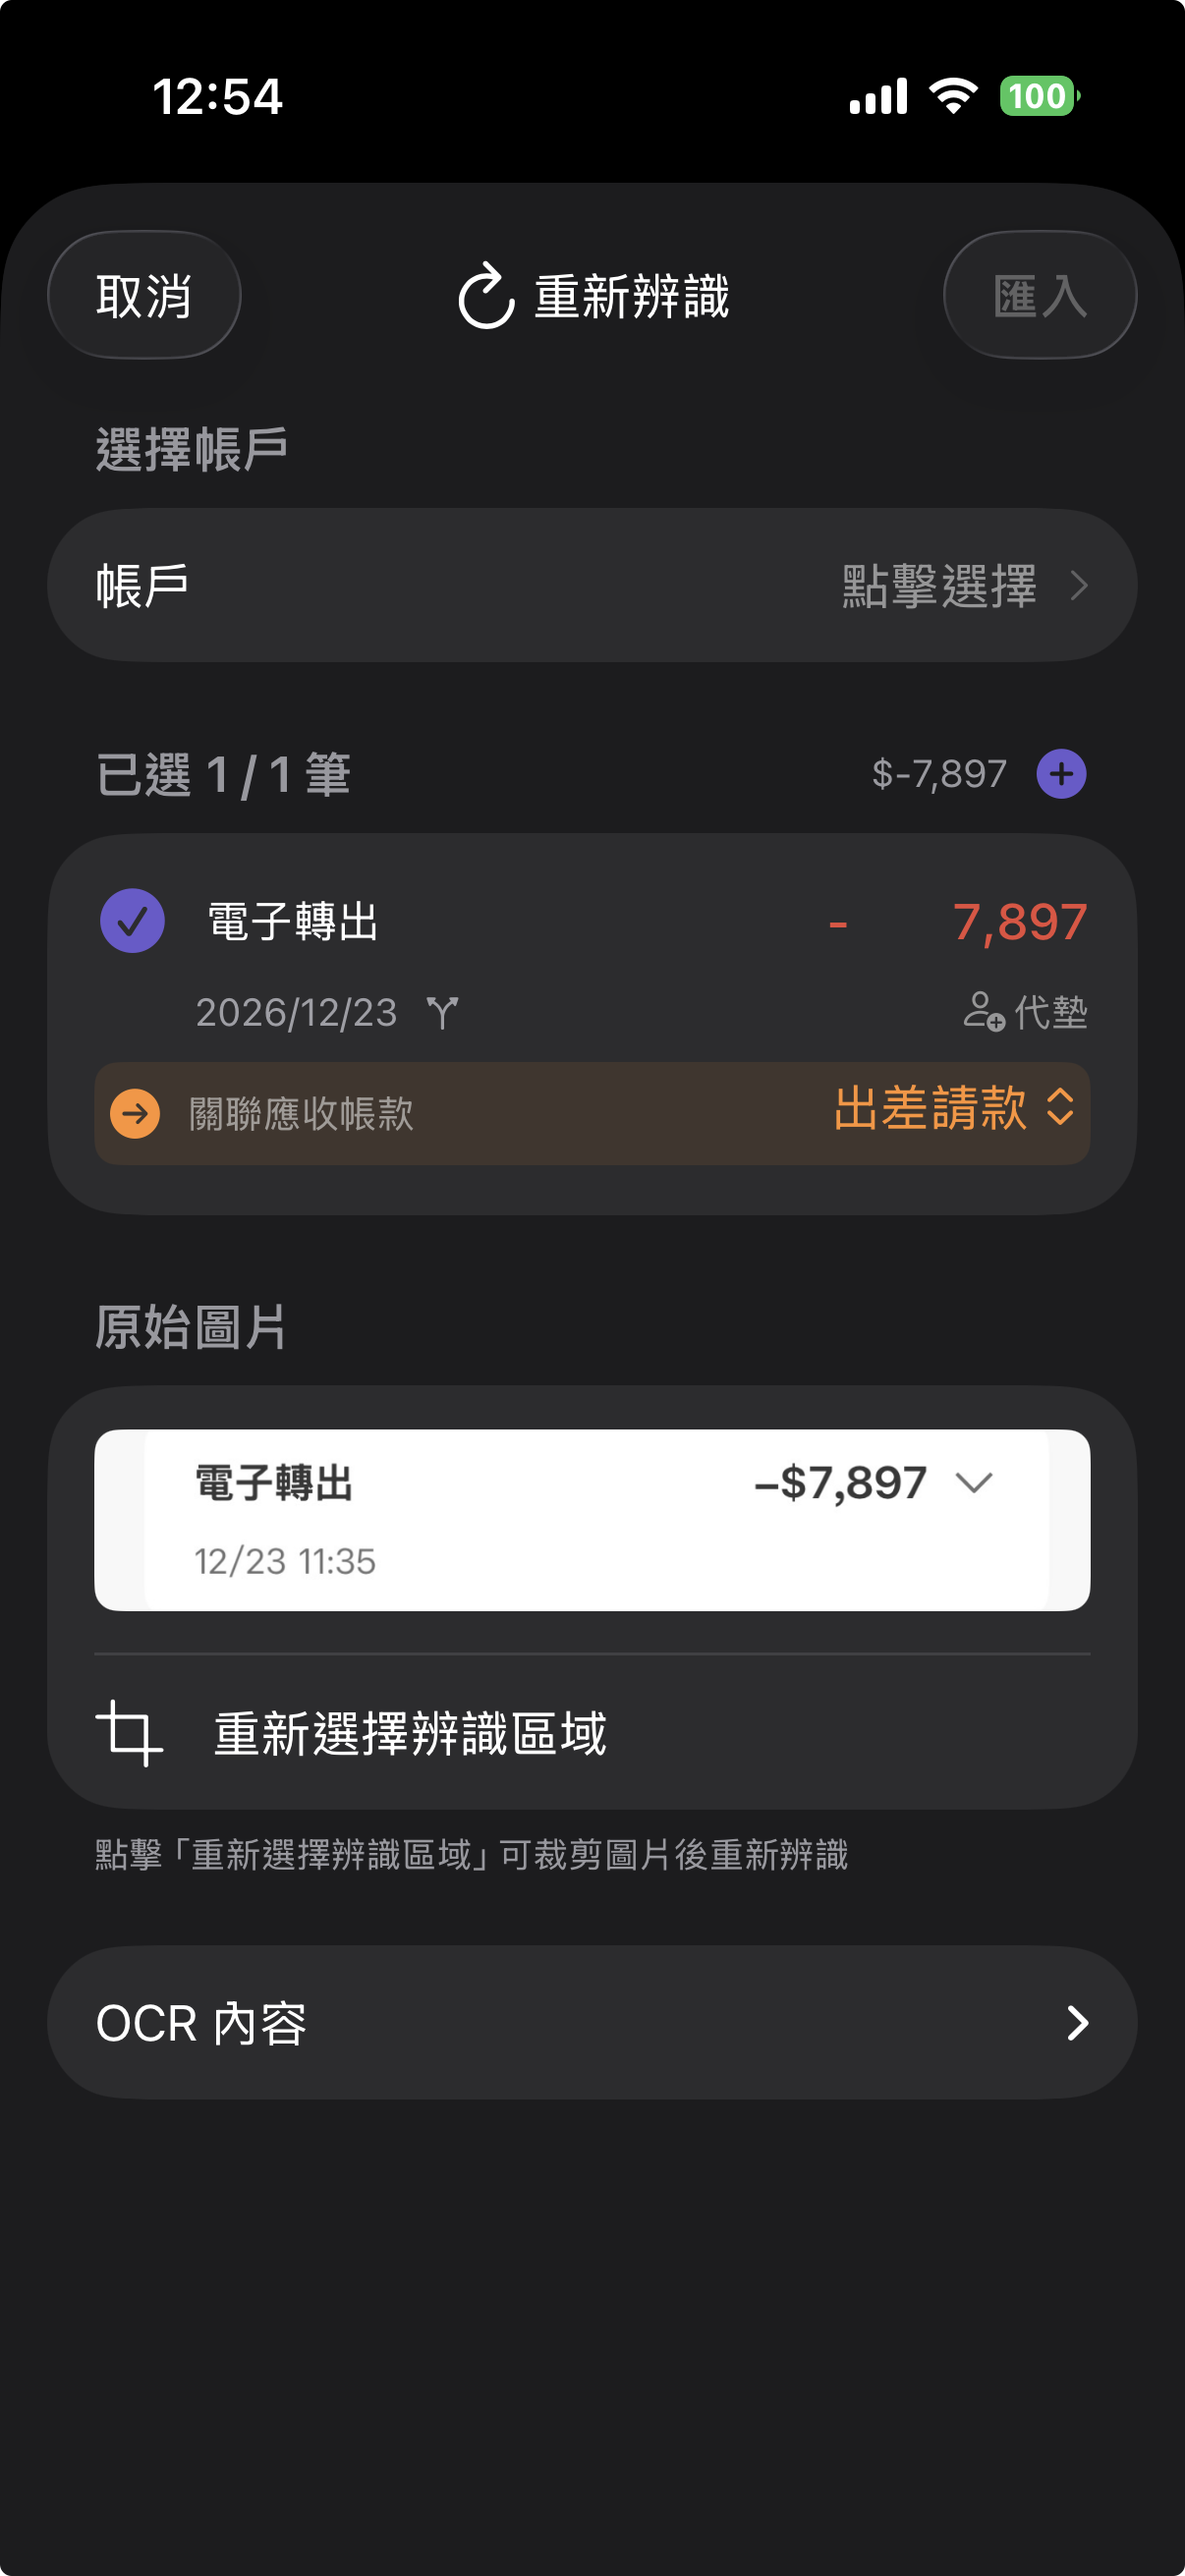
For each trip expense you pay out of pocket, select on behalf of and link it to the business trip account. Once reimbursed, transfer the amount out of the receivable account — the balance clears.
Create an 'Advances' receivable account
Add an accounts receivable account named “Advances” specifically for overseas purchases made on behalf of others.
Tag each purchase as 'on behalf of'
For each overseas purchase, set it as on behalf of linked to the Advances account. When you’re paid back, record a transfer out and the balance clears.
Investment Accounts
Create the account: enter your historical contributions
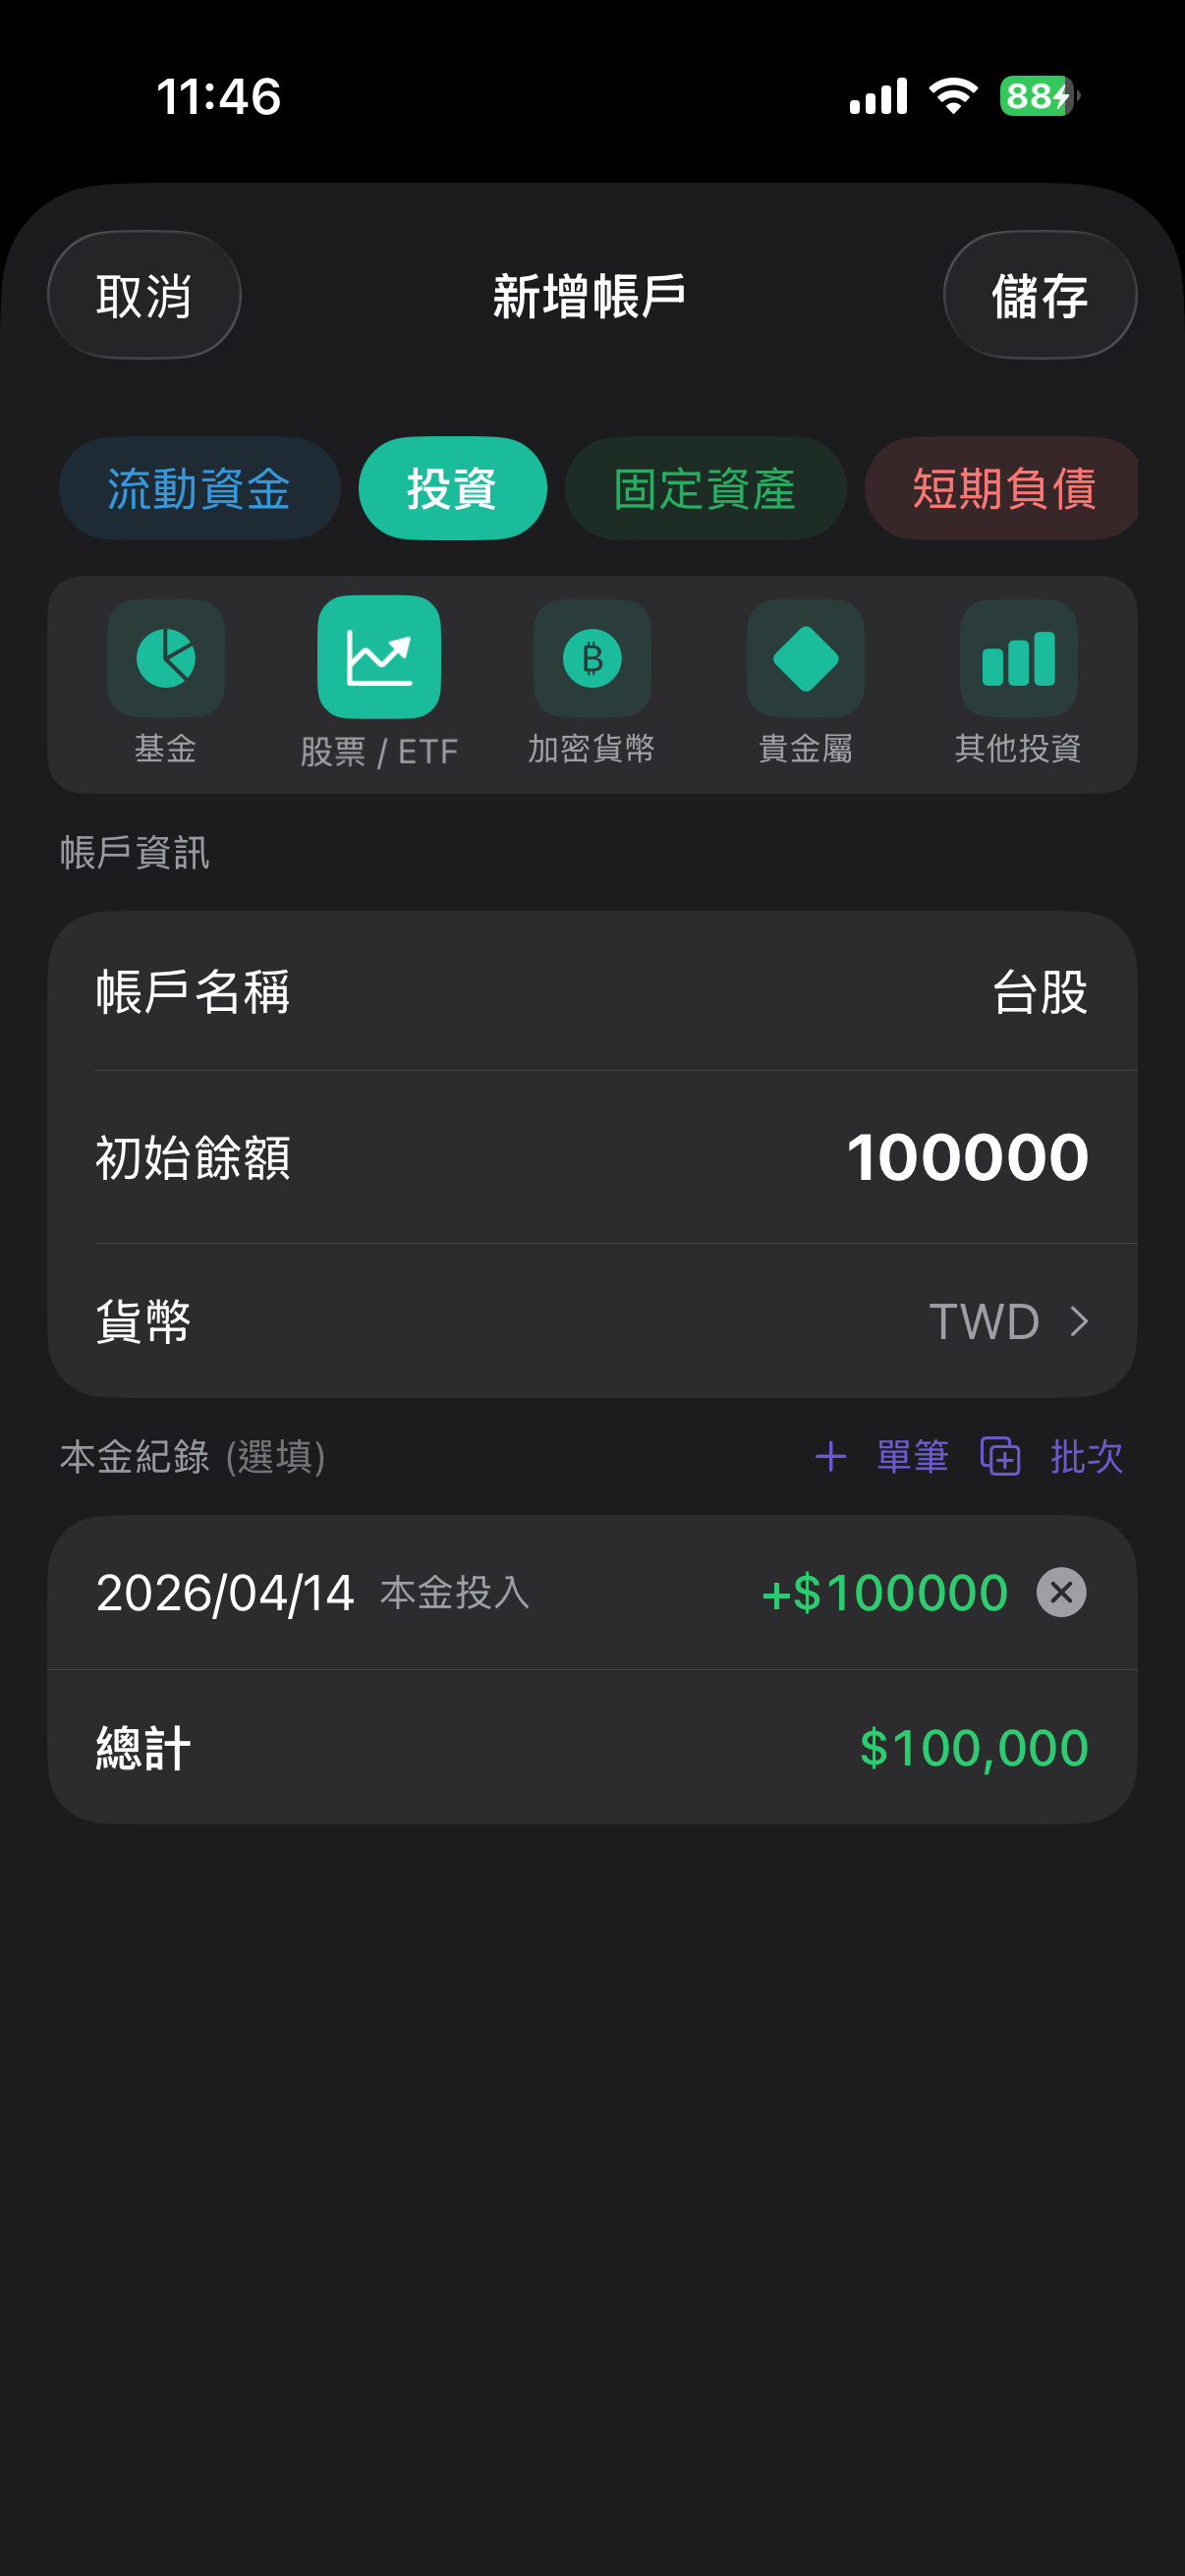
When creating an investment account, enter the date and amount of each past contribution. This data is used to calculate your annualized return (XIRR) and cannot be skipped.
Update balance or adjust amounts later
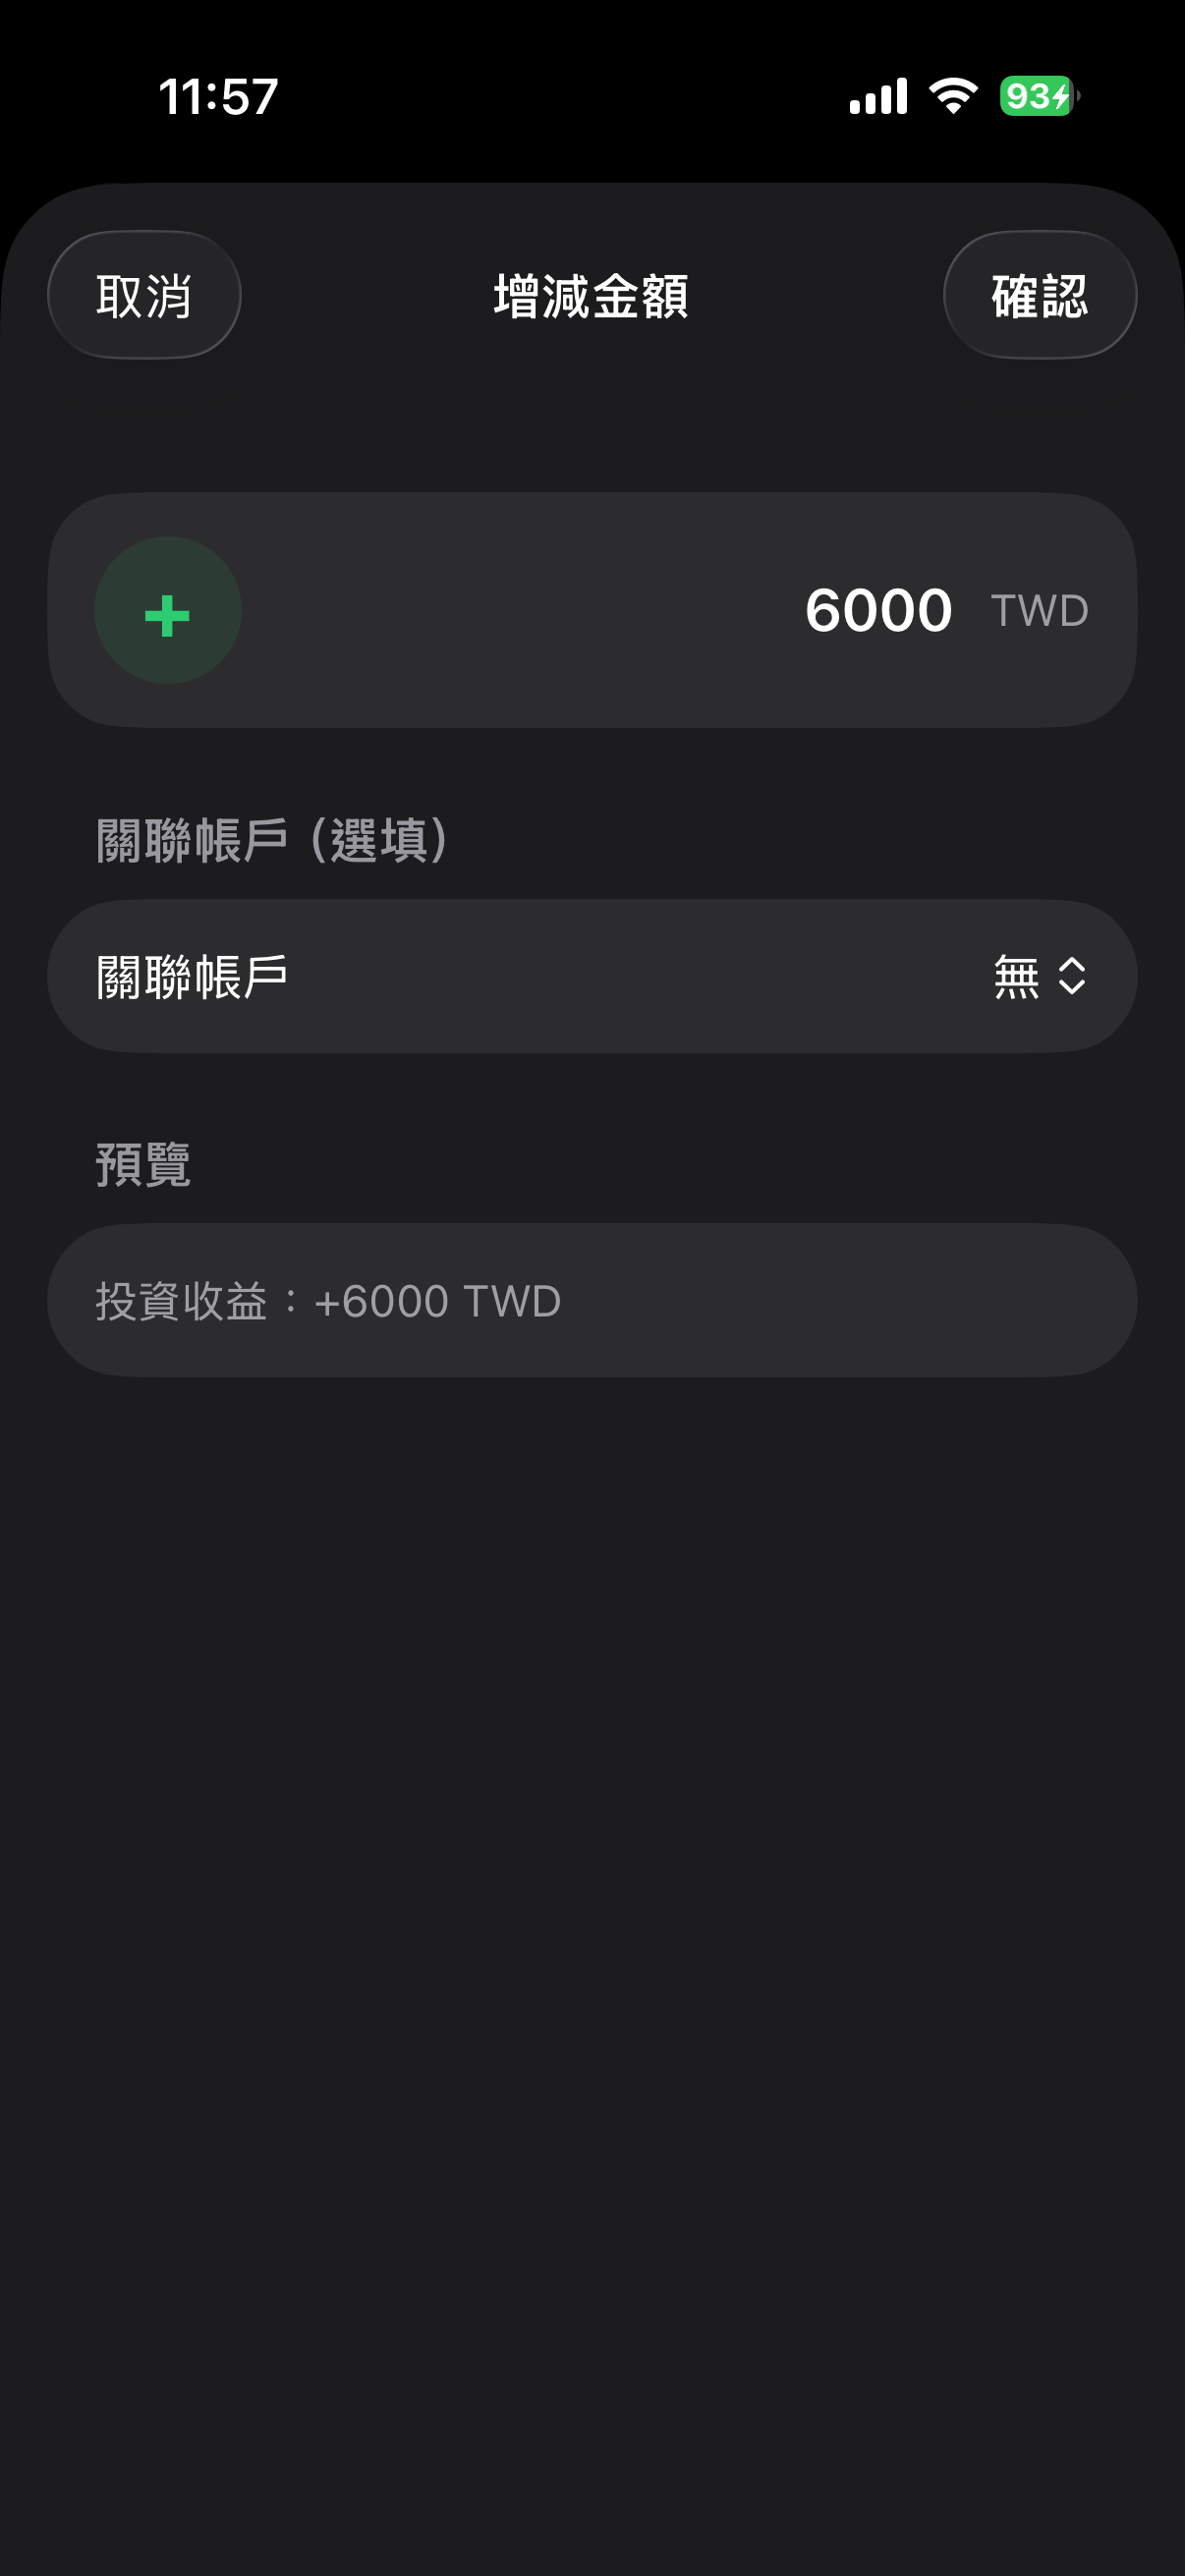
When updating the account balance later:
- With a linked account → treated as a transfer (contribution or withdrawal), no need to manually log a new contribution
- Without a linked account → treated as investment gain or loss (e.g. dividends, unrealized loss)
Auto-translate Foreign Receipts
Before scanning, tap the language in the top-right and enable Auto-translate
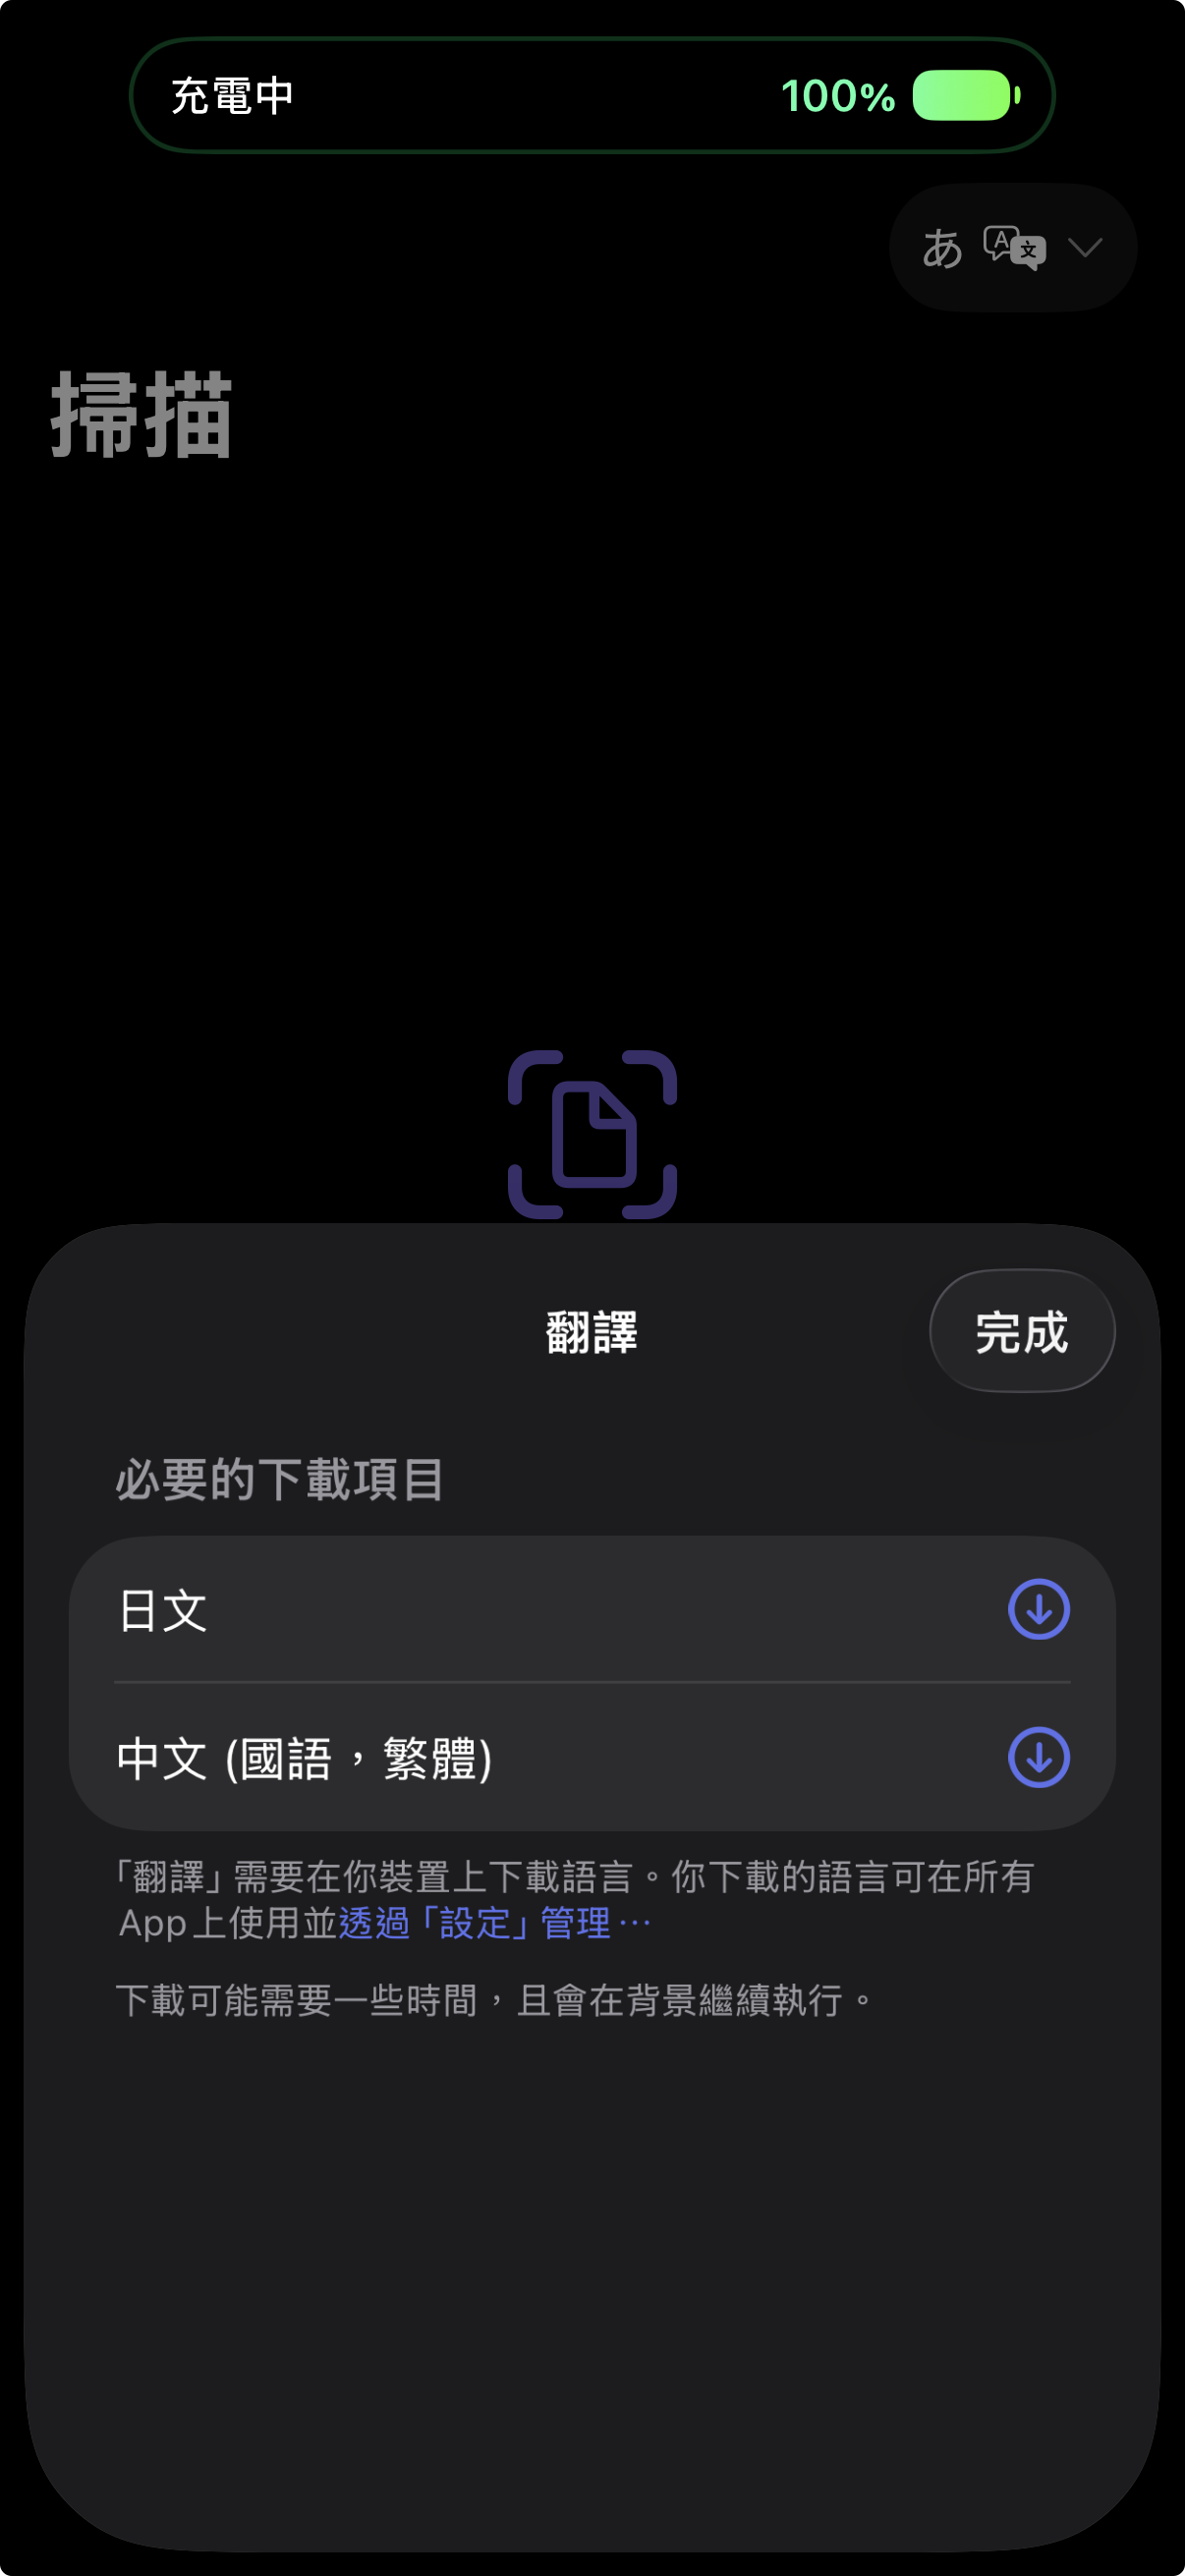
Tap the language label in the top-right corner of the scan screen and enable Auto-translate. If a language pack download appears, tap the download button — do not tap Done — and wait for the iOS translation pack to finish downloading.
Scan and confirm
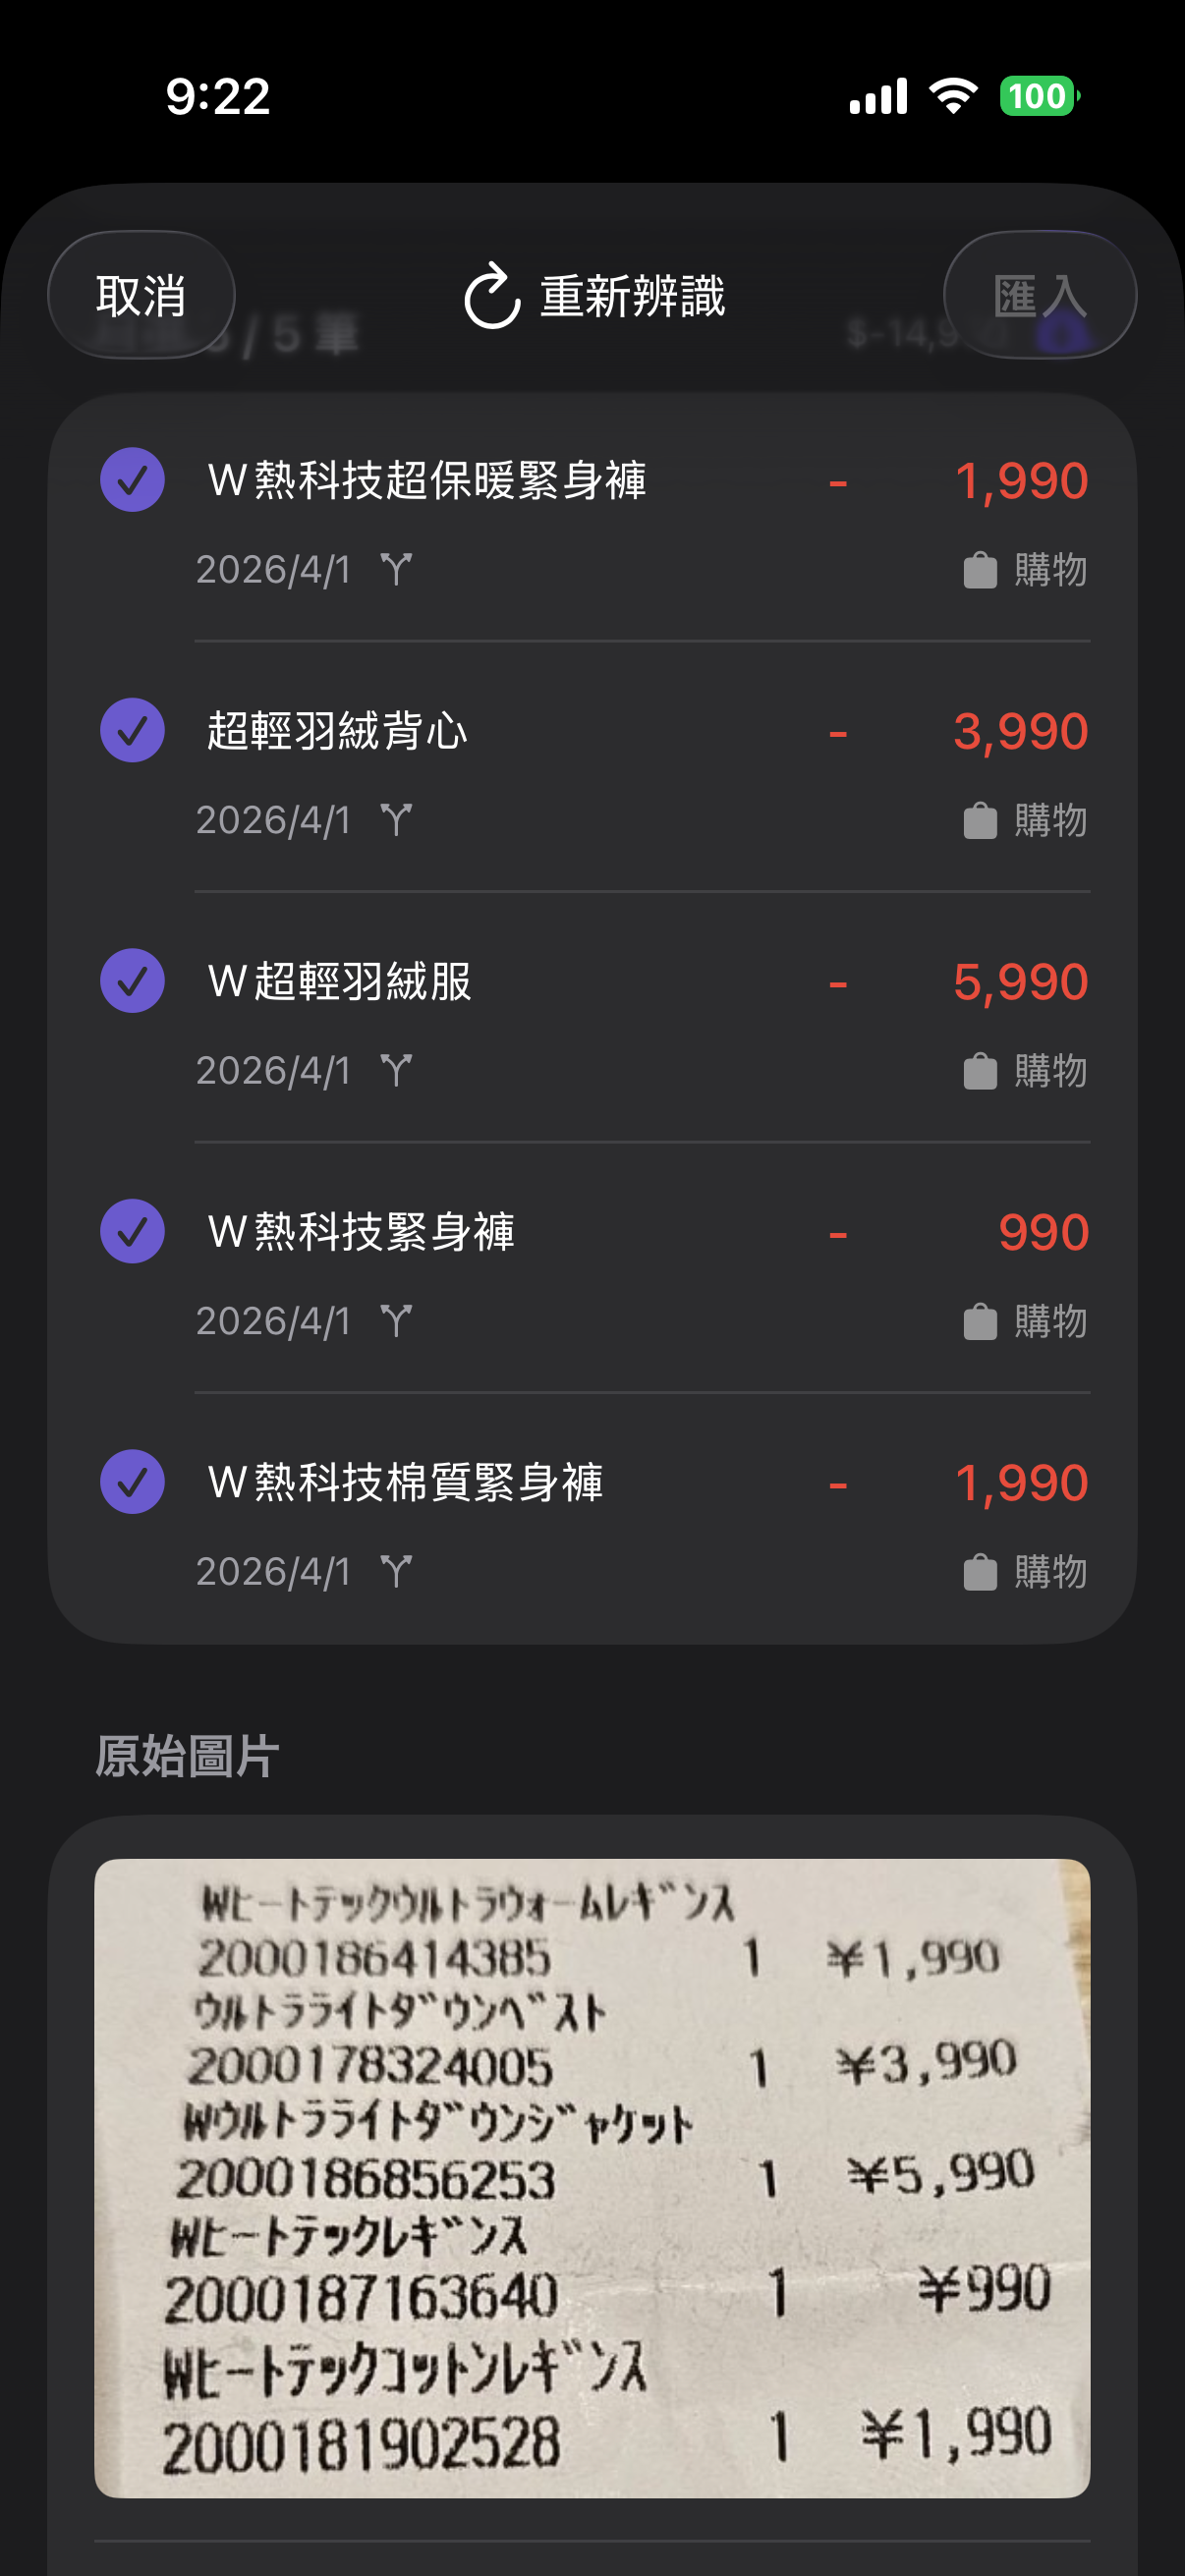
After scanning, the app will automatically translate item names into your language.
05
AI Category Learning
Enable or disable automatic category learning
Go to Settings → Category Management → select a category to find the “Auto-learn your categorization preferences” toggle.
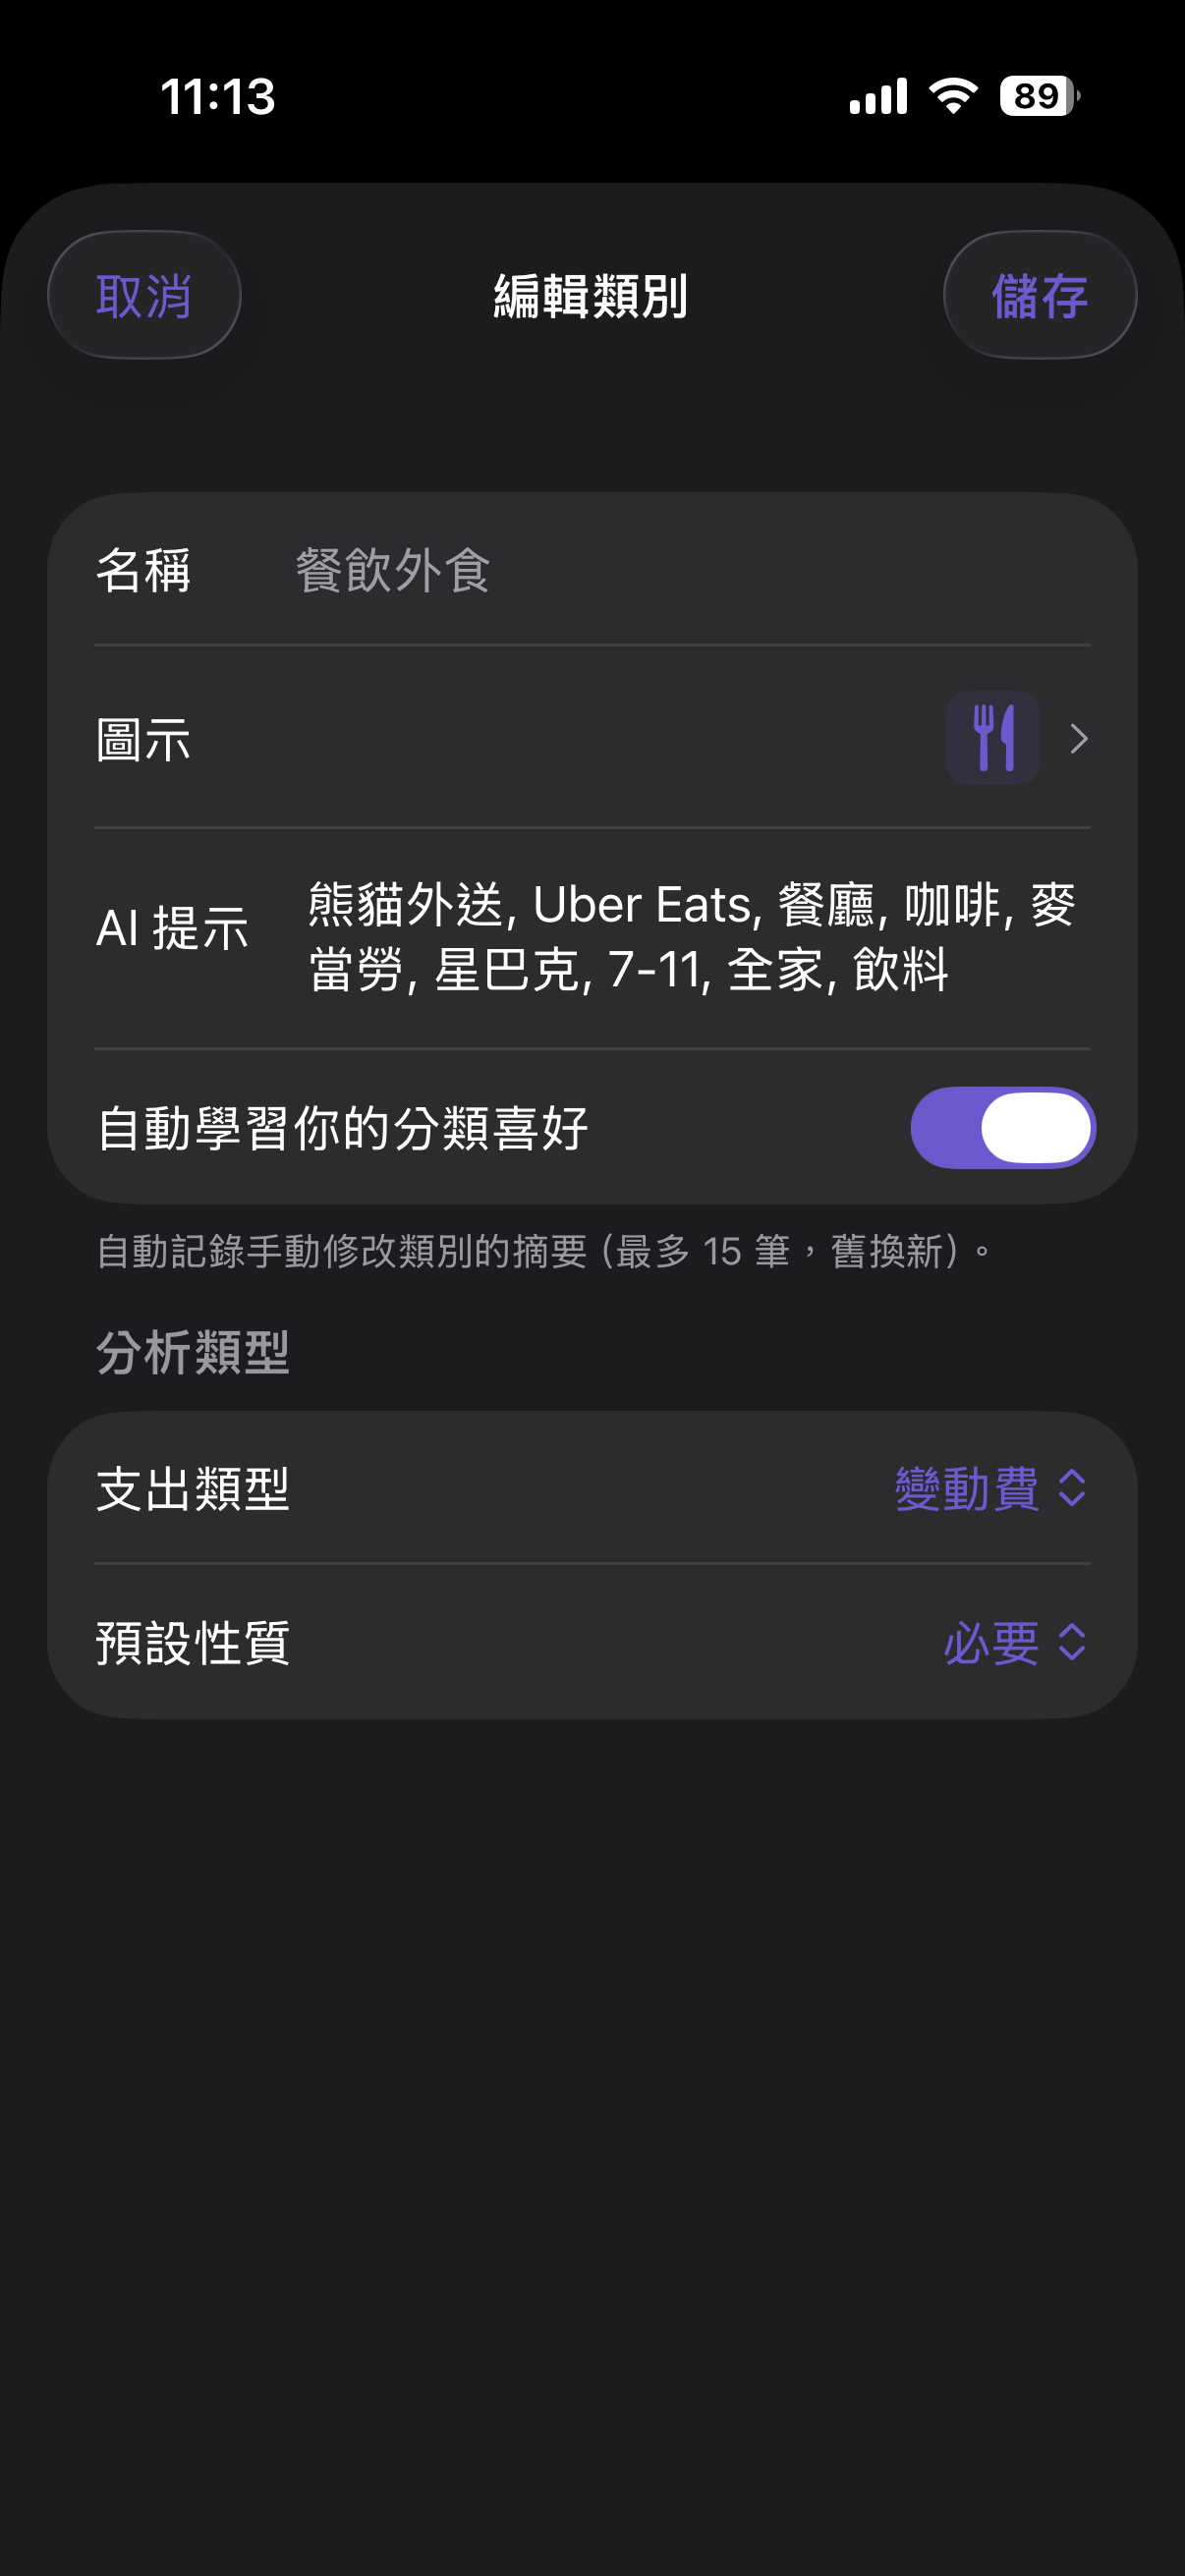
On: When AI miscategorizes a transaction and you manually correct it, that memo is automatically added to the AI prompt. Next time, the AI will know to put similar memos into that category.
Off: Because AI memory is limited, it keeps the newest entries and drops the oldest when it hits the limit. If you’d prefer stable behavior, turn this off and manually enter your most-used memos — they won’t be automatically forgotten.
06
iOS Shortcuts
Set up one-tap or voice-triggered bookkeeping
Batch Screenshot Shortcut (Triple-tap the back of your iPhone)
Open the Shortcuts app and create a new shortcut
Swipe all the way left on your home screen to reach the App Library. Search for Shortcuts, then tap + in the top right to create a new shortcut.
Set up the shortcut actions
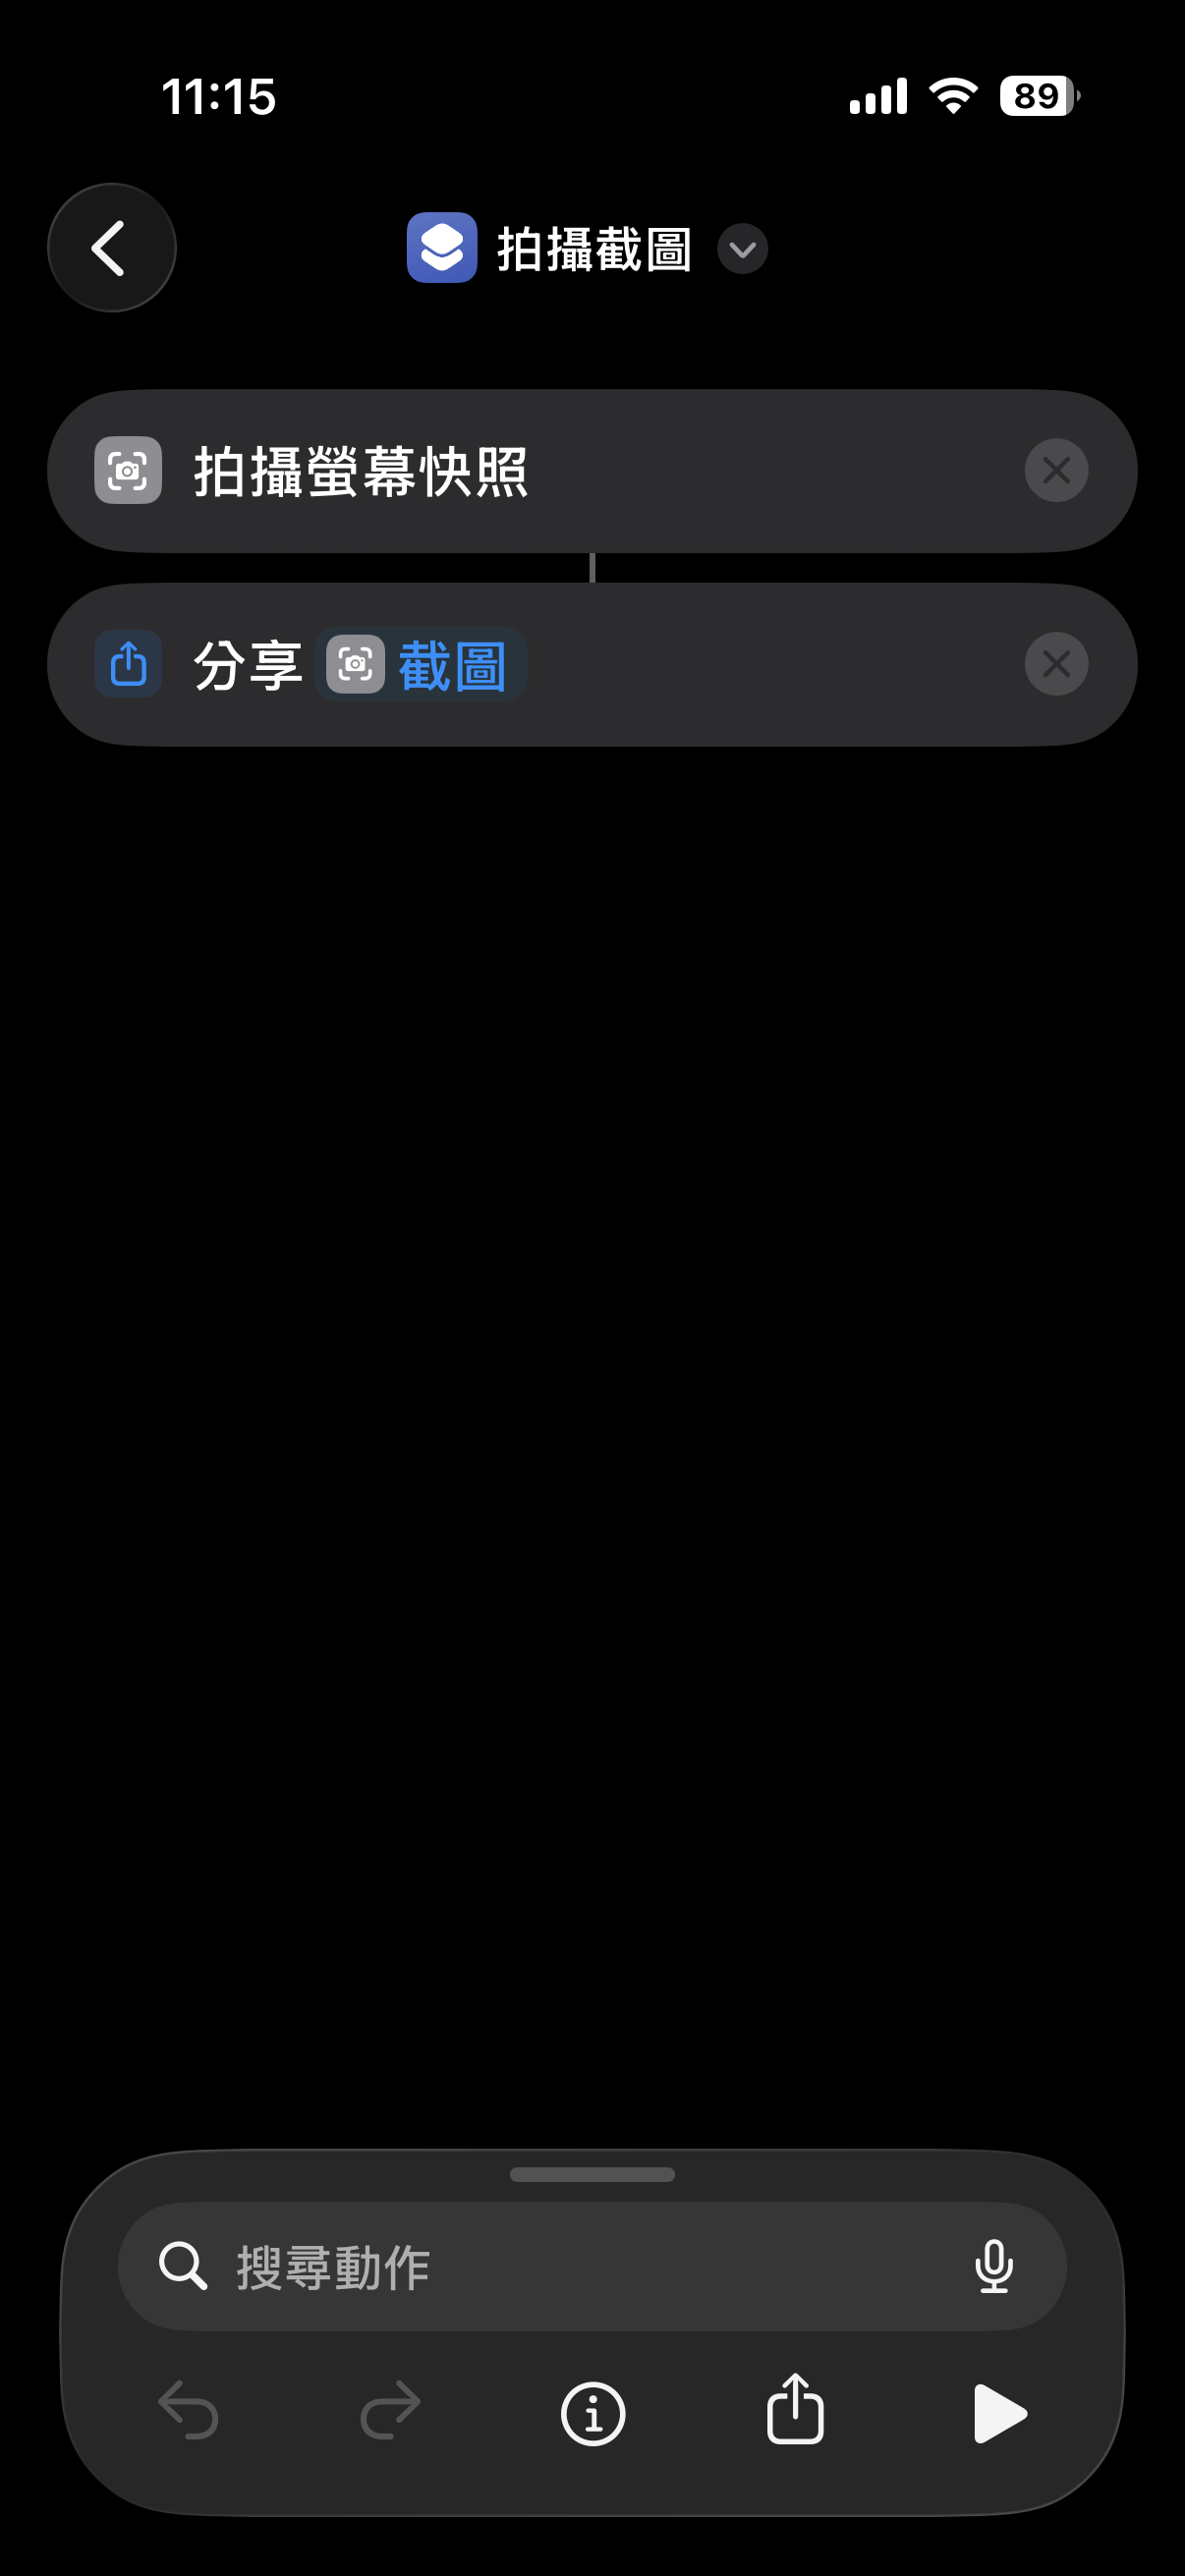
Rename it “Take Screenshot”, then add two actions in order:
- Take Screenshot (captures the screen)
- Share (shares the screenshot)
Assign it to Back Tap

Go to Settings → Accessibility → Touch → Back Tap → Triple Tap, then select the “Take Screenshot” shortcut you just created.
Use it
Triple-tap the back of your iPhone. The system screenshots the current screen and shows a share sheet — select Kakei AI to batch import.
Voice Logging Shortcut (Hey Siri, log expense)
Open the Shortcuts app and create a new shortcut
Same as above — go to App Library, search Shortcuts, tap +.
Set up the shortcut actions
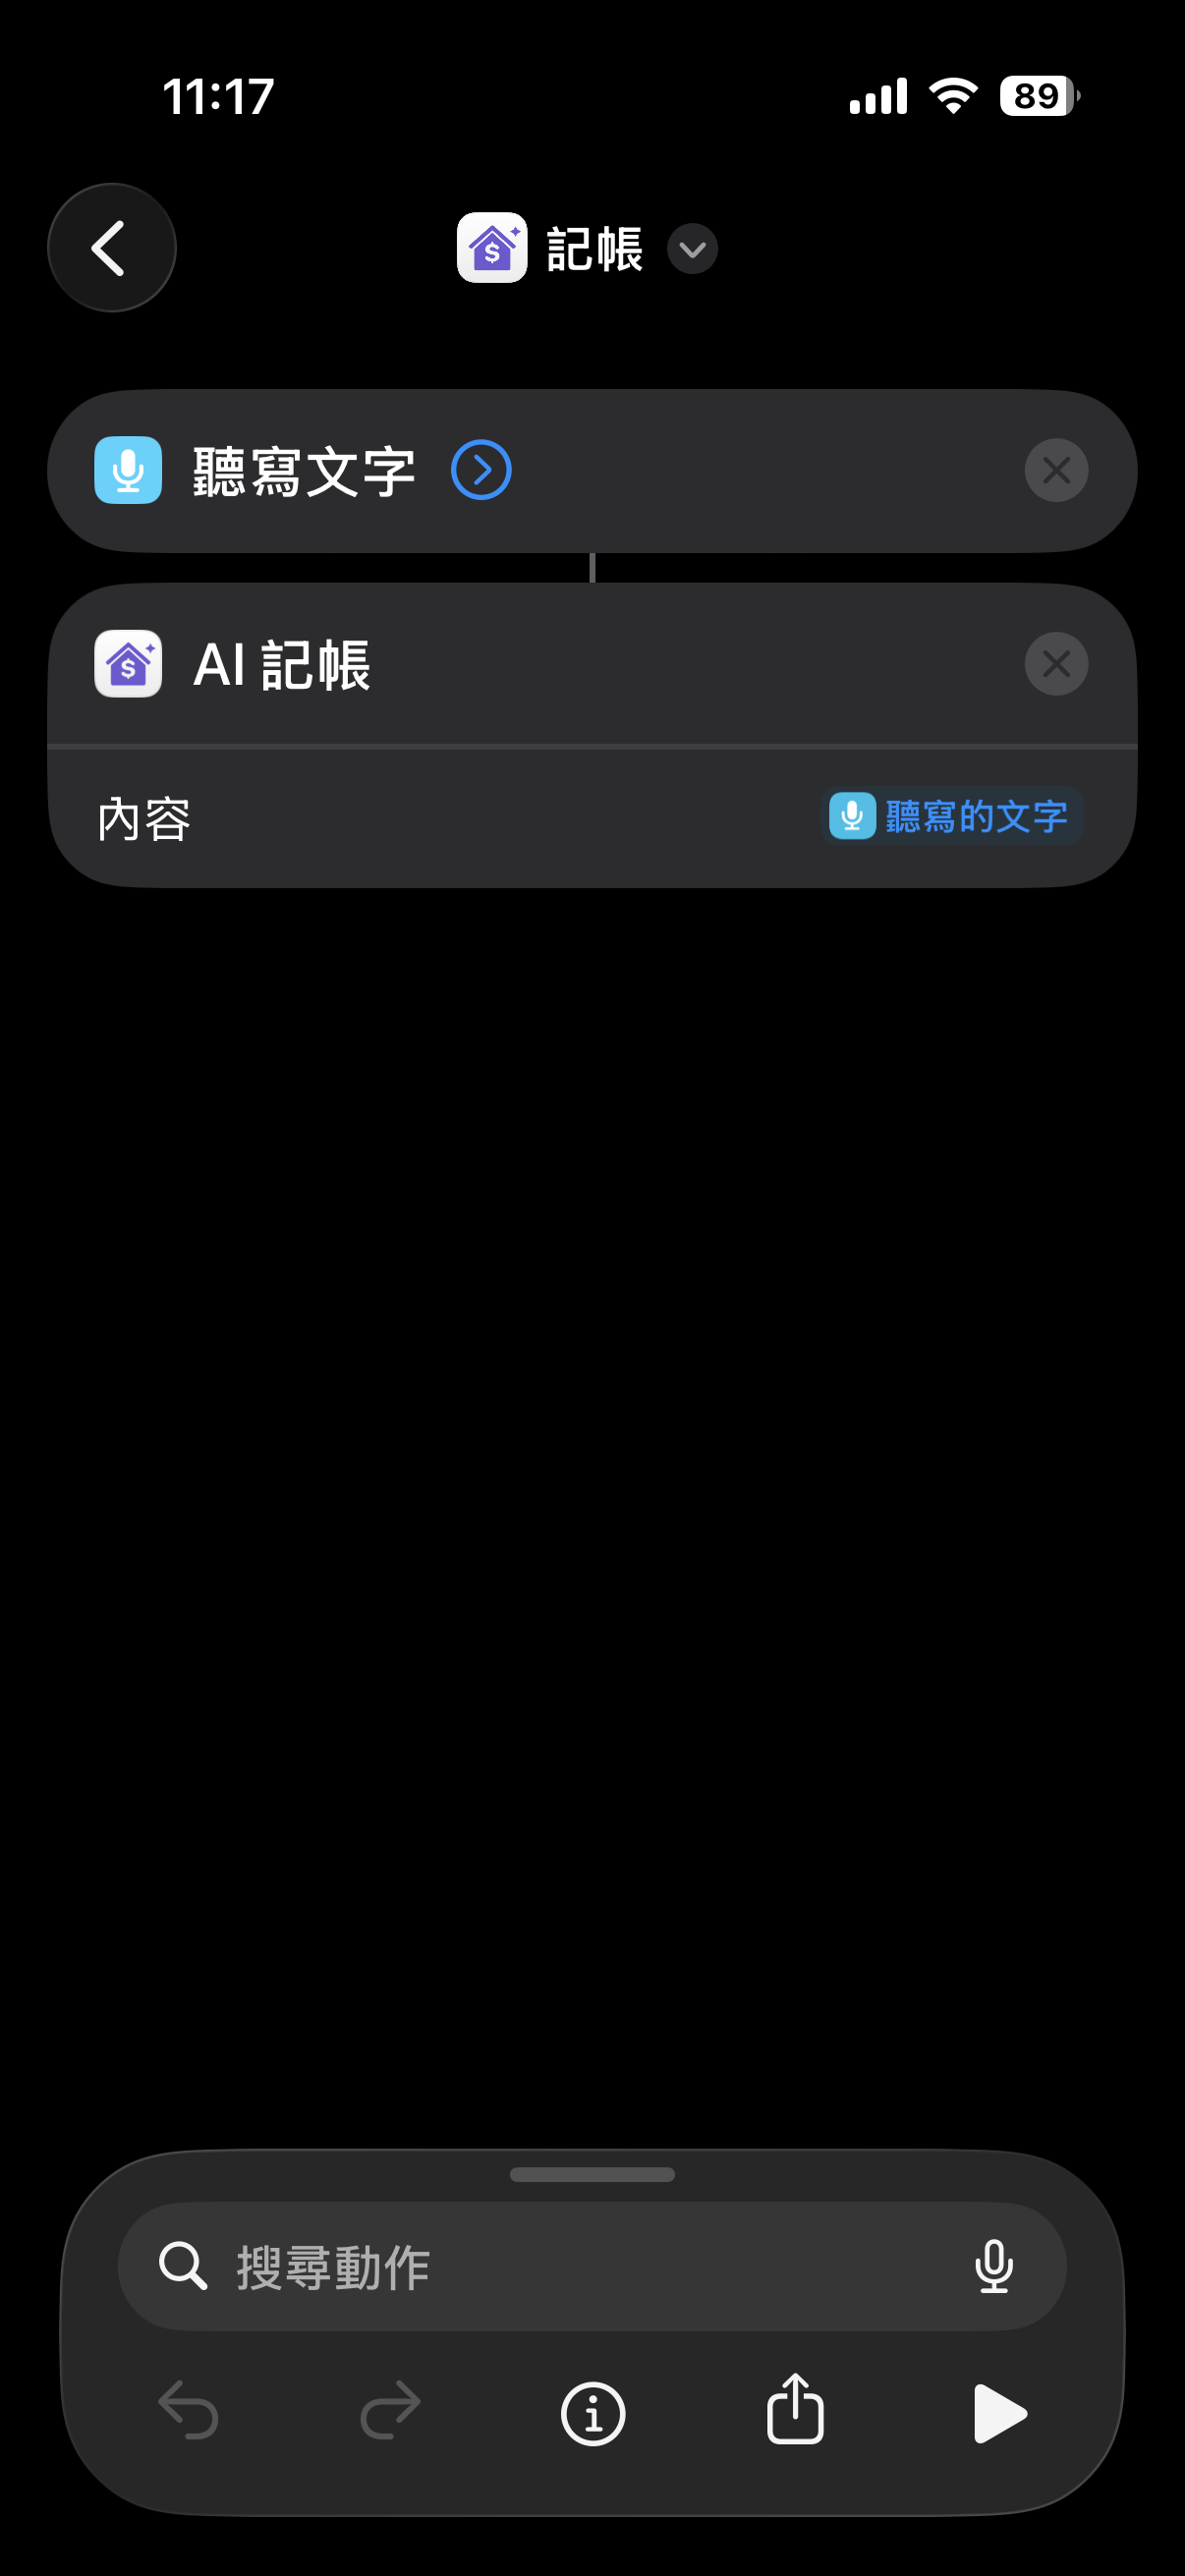
Rename it “Log Expense”, then add two actions:
- Dictate Text
- Log Expense (Kakei AI icon) → tap Input, select Dictated Text
Use it
Say: “Hey Siri, log expense.” Siri prompts for input. Speak your transaction, for example:
“Shinkansen, $120”
Kakei AI parses it and creates the entry automatically.
07
Dashboard Sharing
Share your financial dashboard with a partner or family member
Open sharing settings
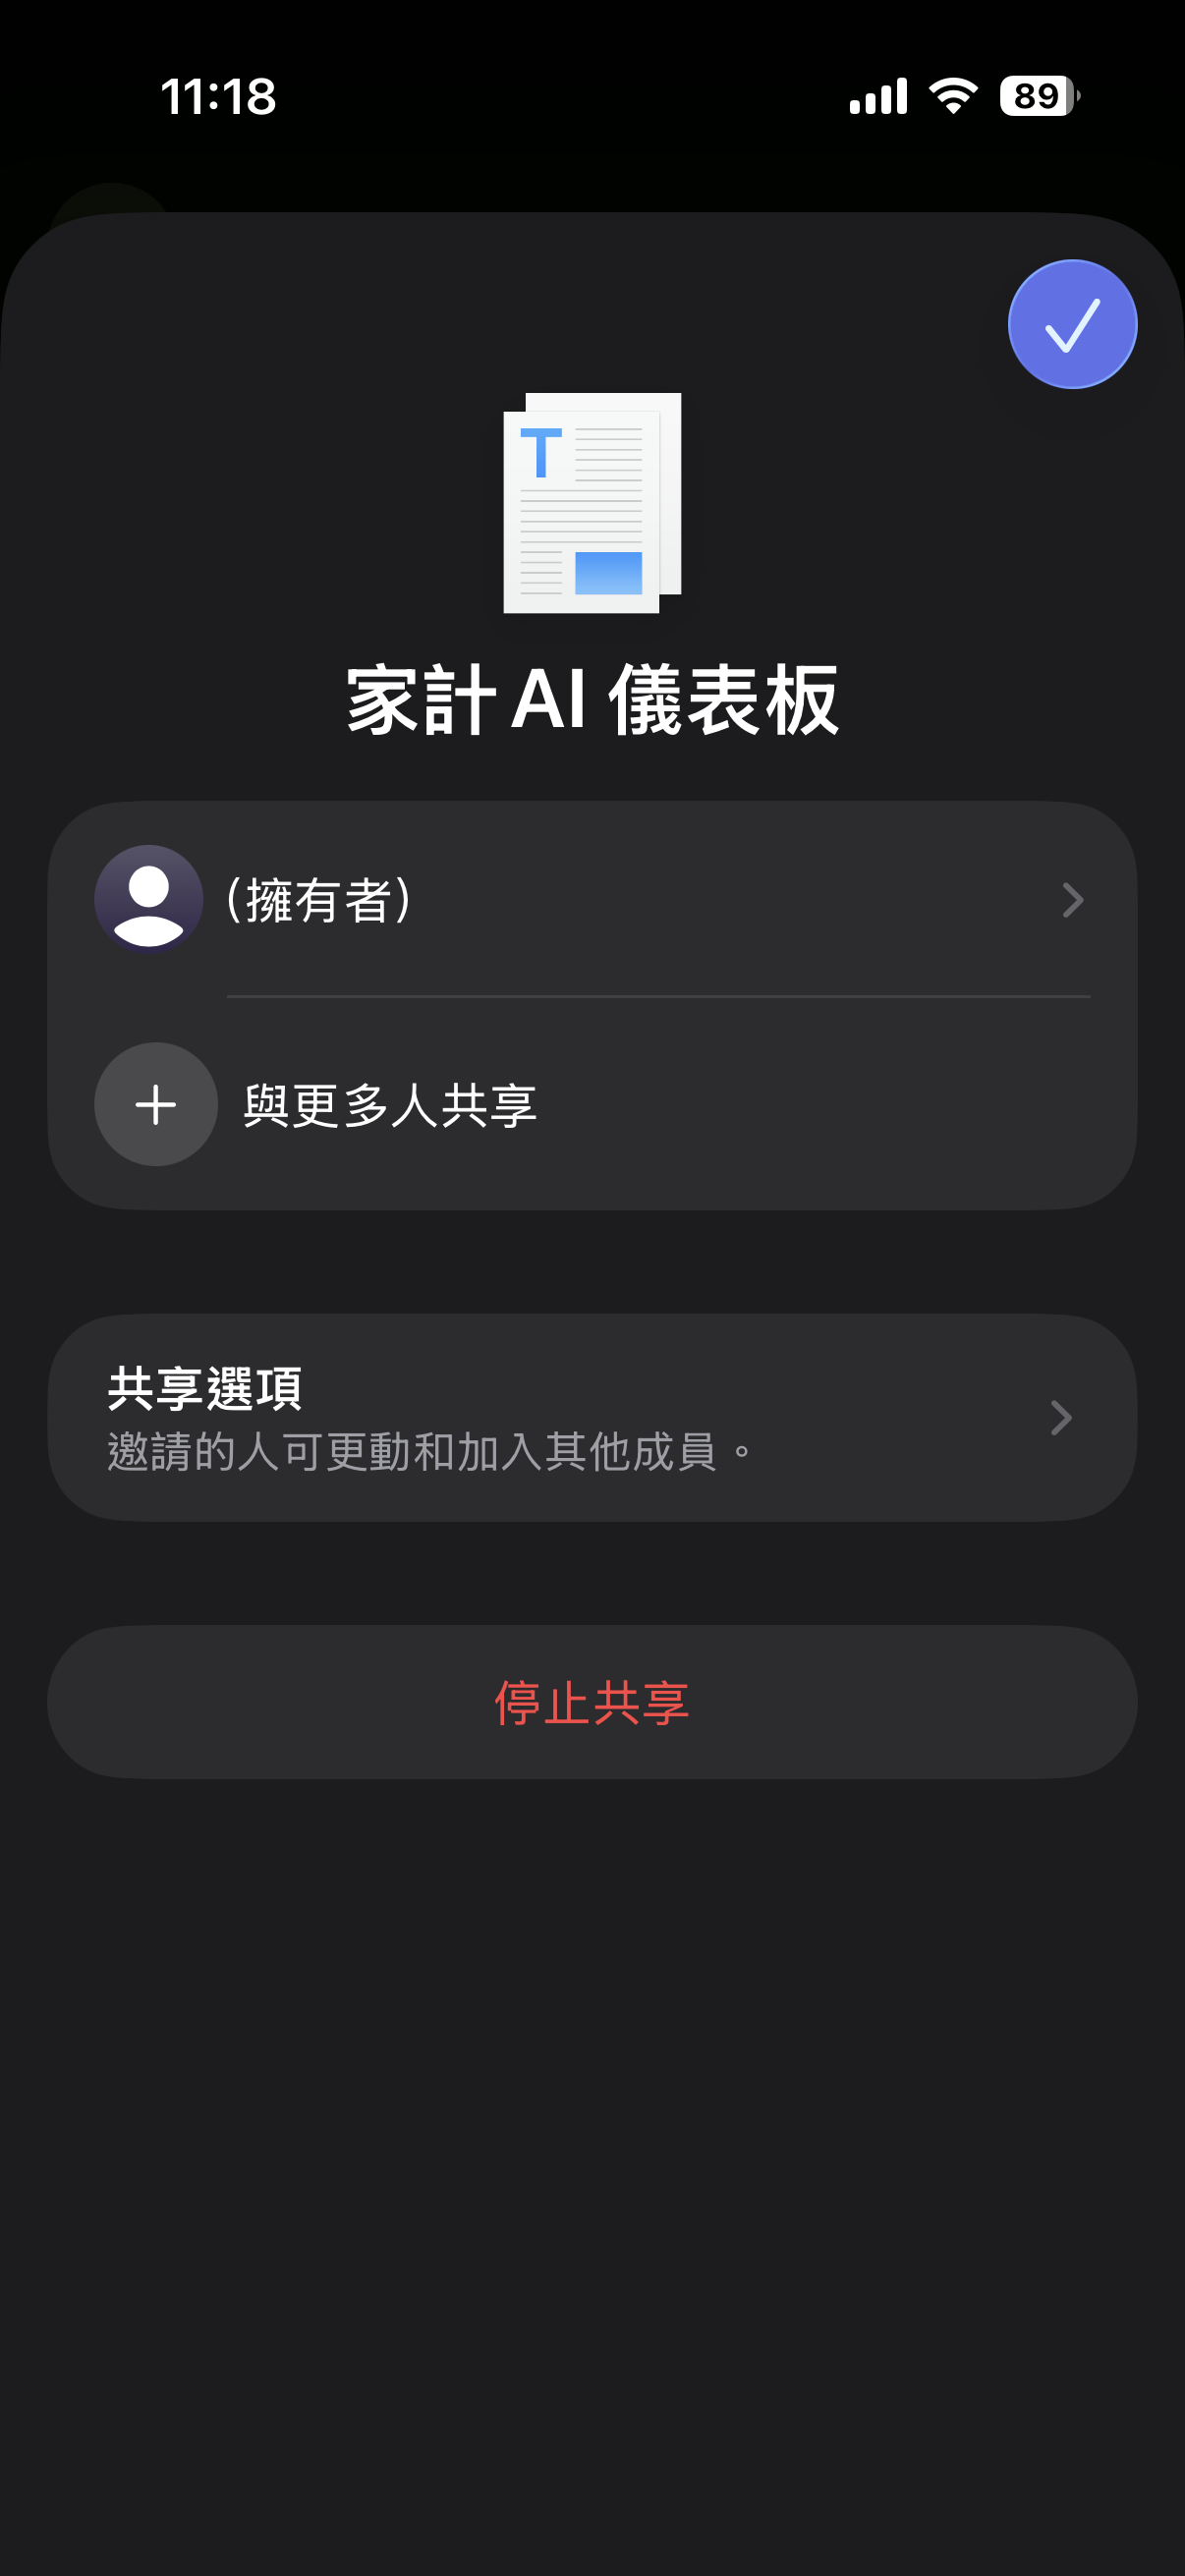
Go to Settings → Cloud & Sharing → Sharing Settings → Share with more people.
Choose how to send the invite link
Select how to send the invite link — you can send directly to a contact via a messaging app.
Enter the recipient's Apple ID
On the link creation screen, enter the recipient’s Apple ID email address, then tap Share Link.
Recipient accepts the invite
The recipient goes to Settings → Cloud & Sharing → Shared with Me, pastes the link, and taps Accept.
View each other's dashboard
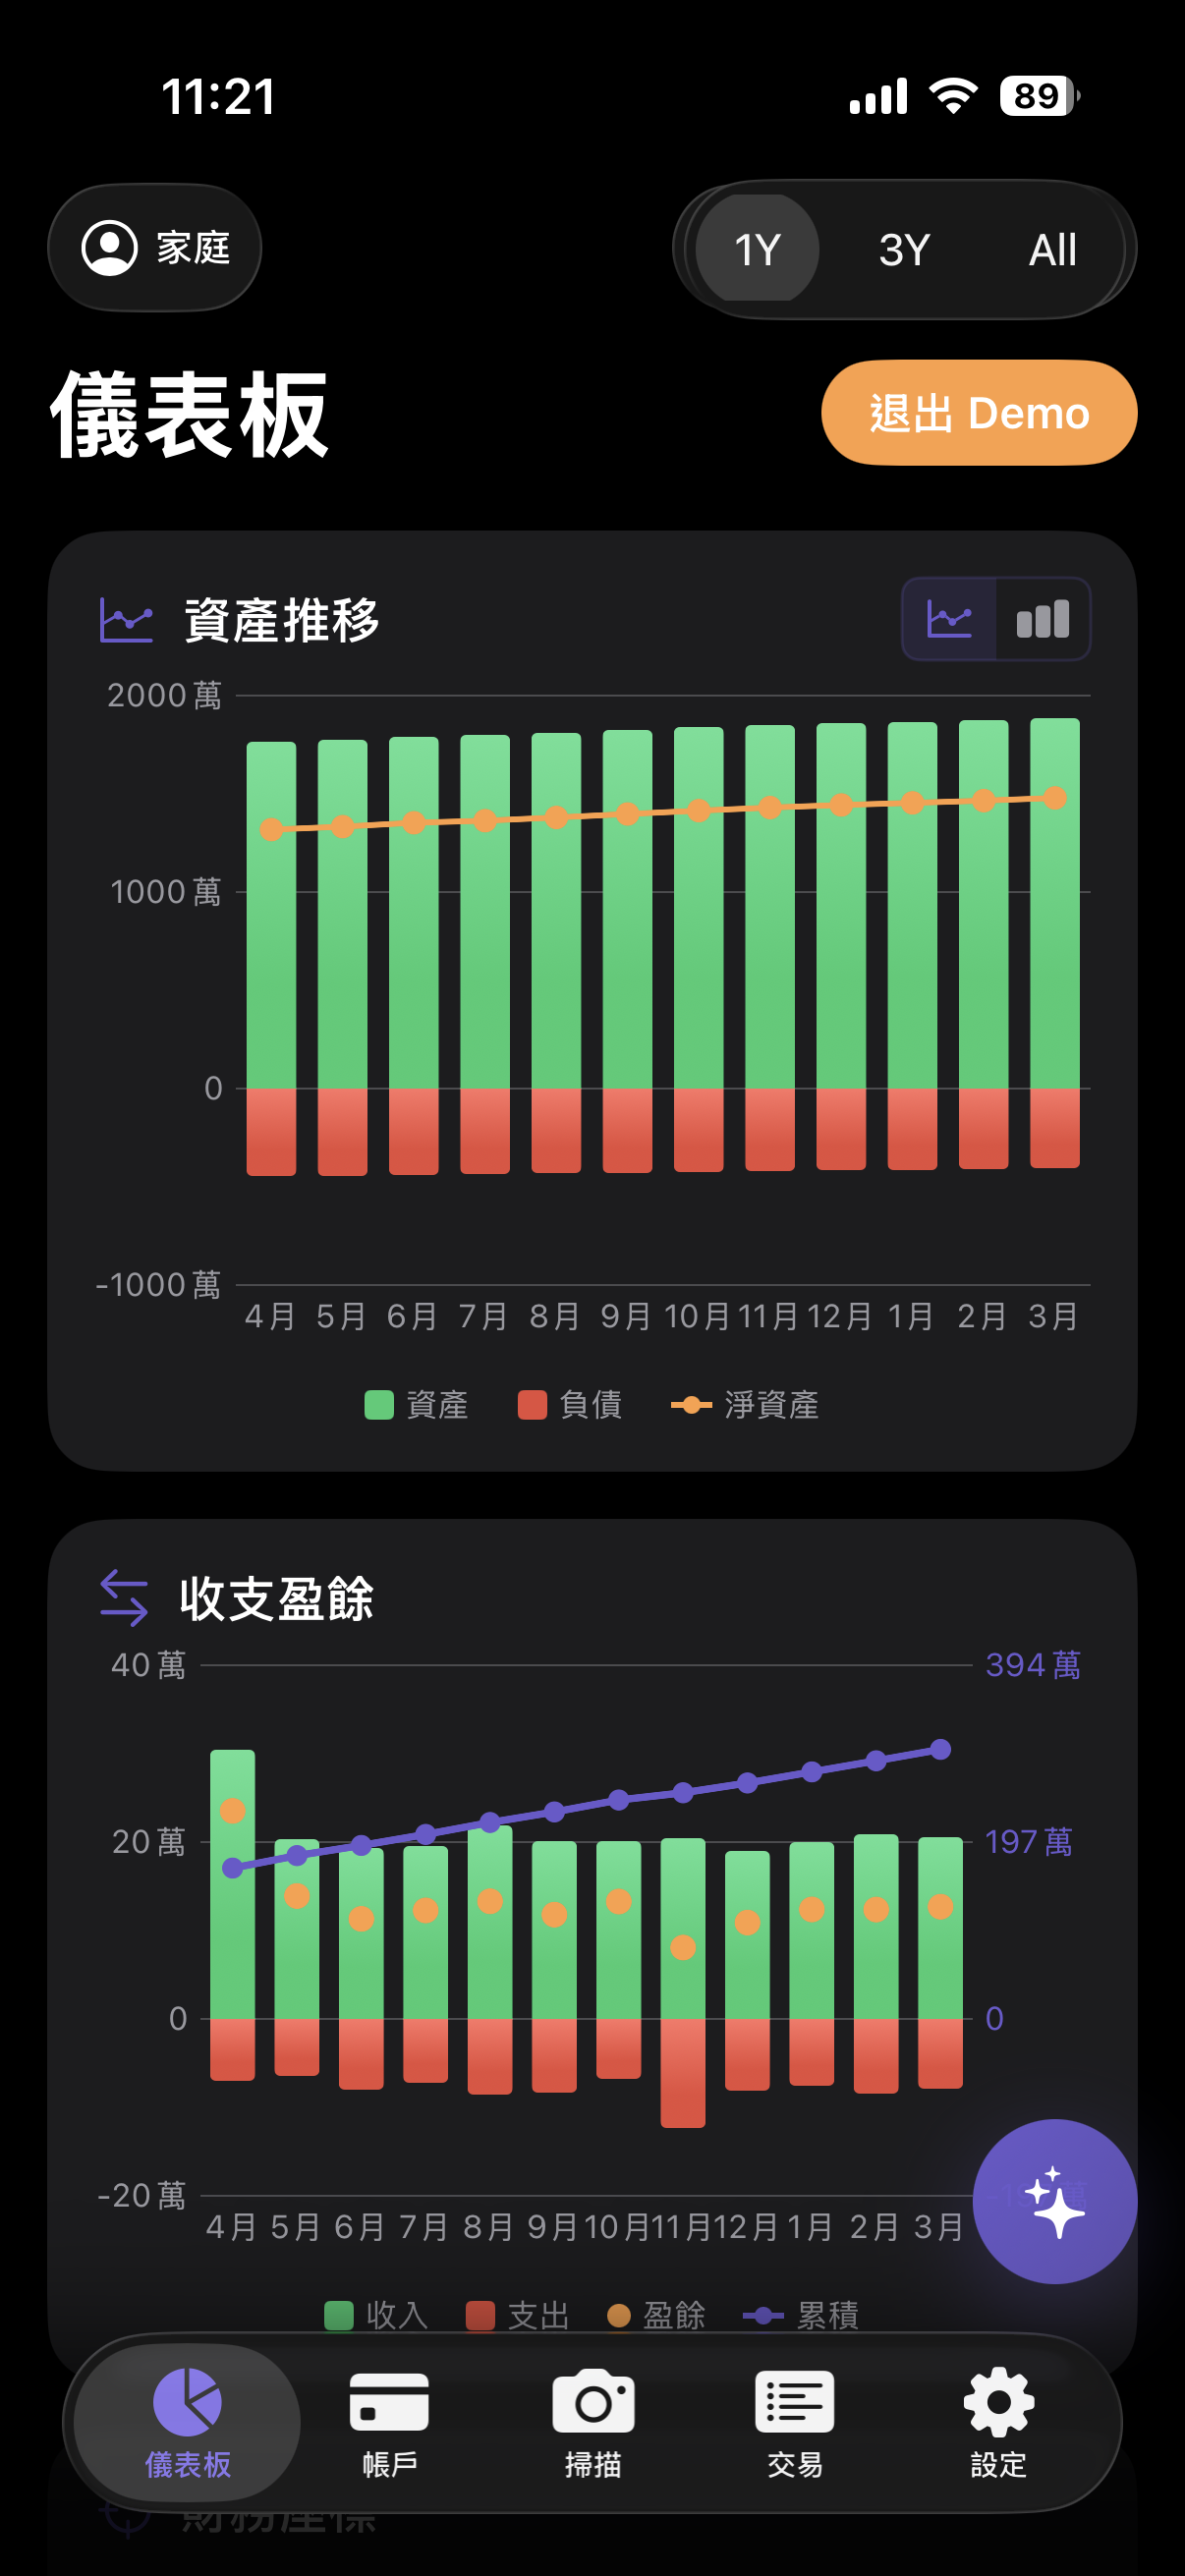
Once connected, switch between Partner or Family views in the dashboard to see each other’s financial stats.
08
Import Previous Records
You can import data from your own Excel file or a CSV exported from another app using the conversion tool below.
Privacy note: This tool runs entirely in your browser — your data never leaves your computer. The page source is open for inspection.
Download the tool and follow the on-screen instructions
↓ Download CSV ConverterDownload the tool, open it, and follow the steps on the page to convert your file into a format Kakei AI can import.
Move the converted file to the Files app on your iPhone
Transfer the converted file to your iPhone via AirDrop, iCloud, or by connecting to your computer, and place it in the Files app.
Use the Import Backup feature
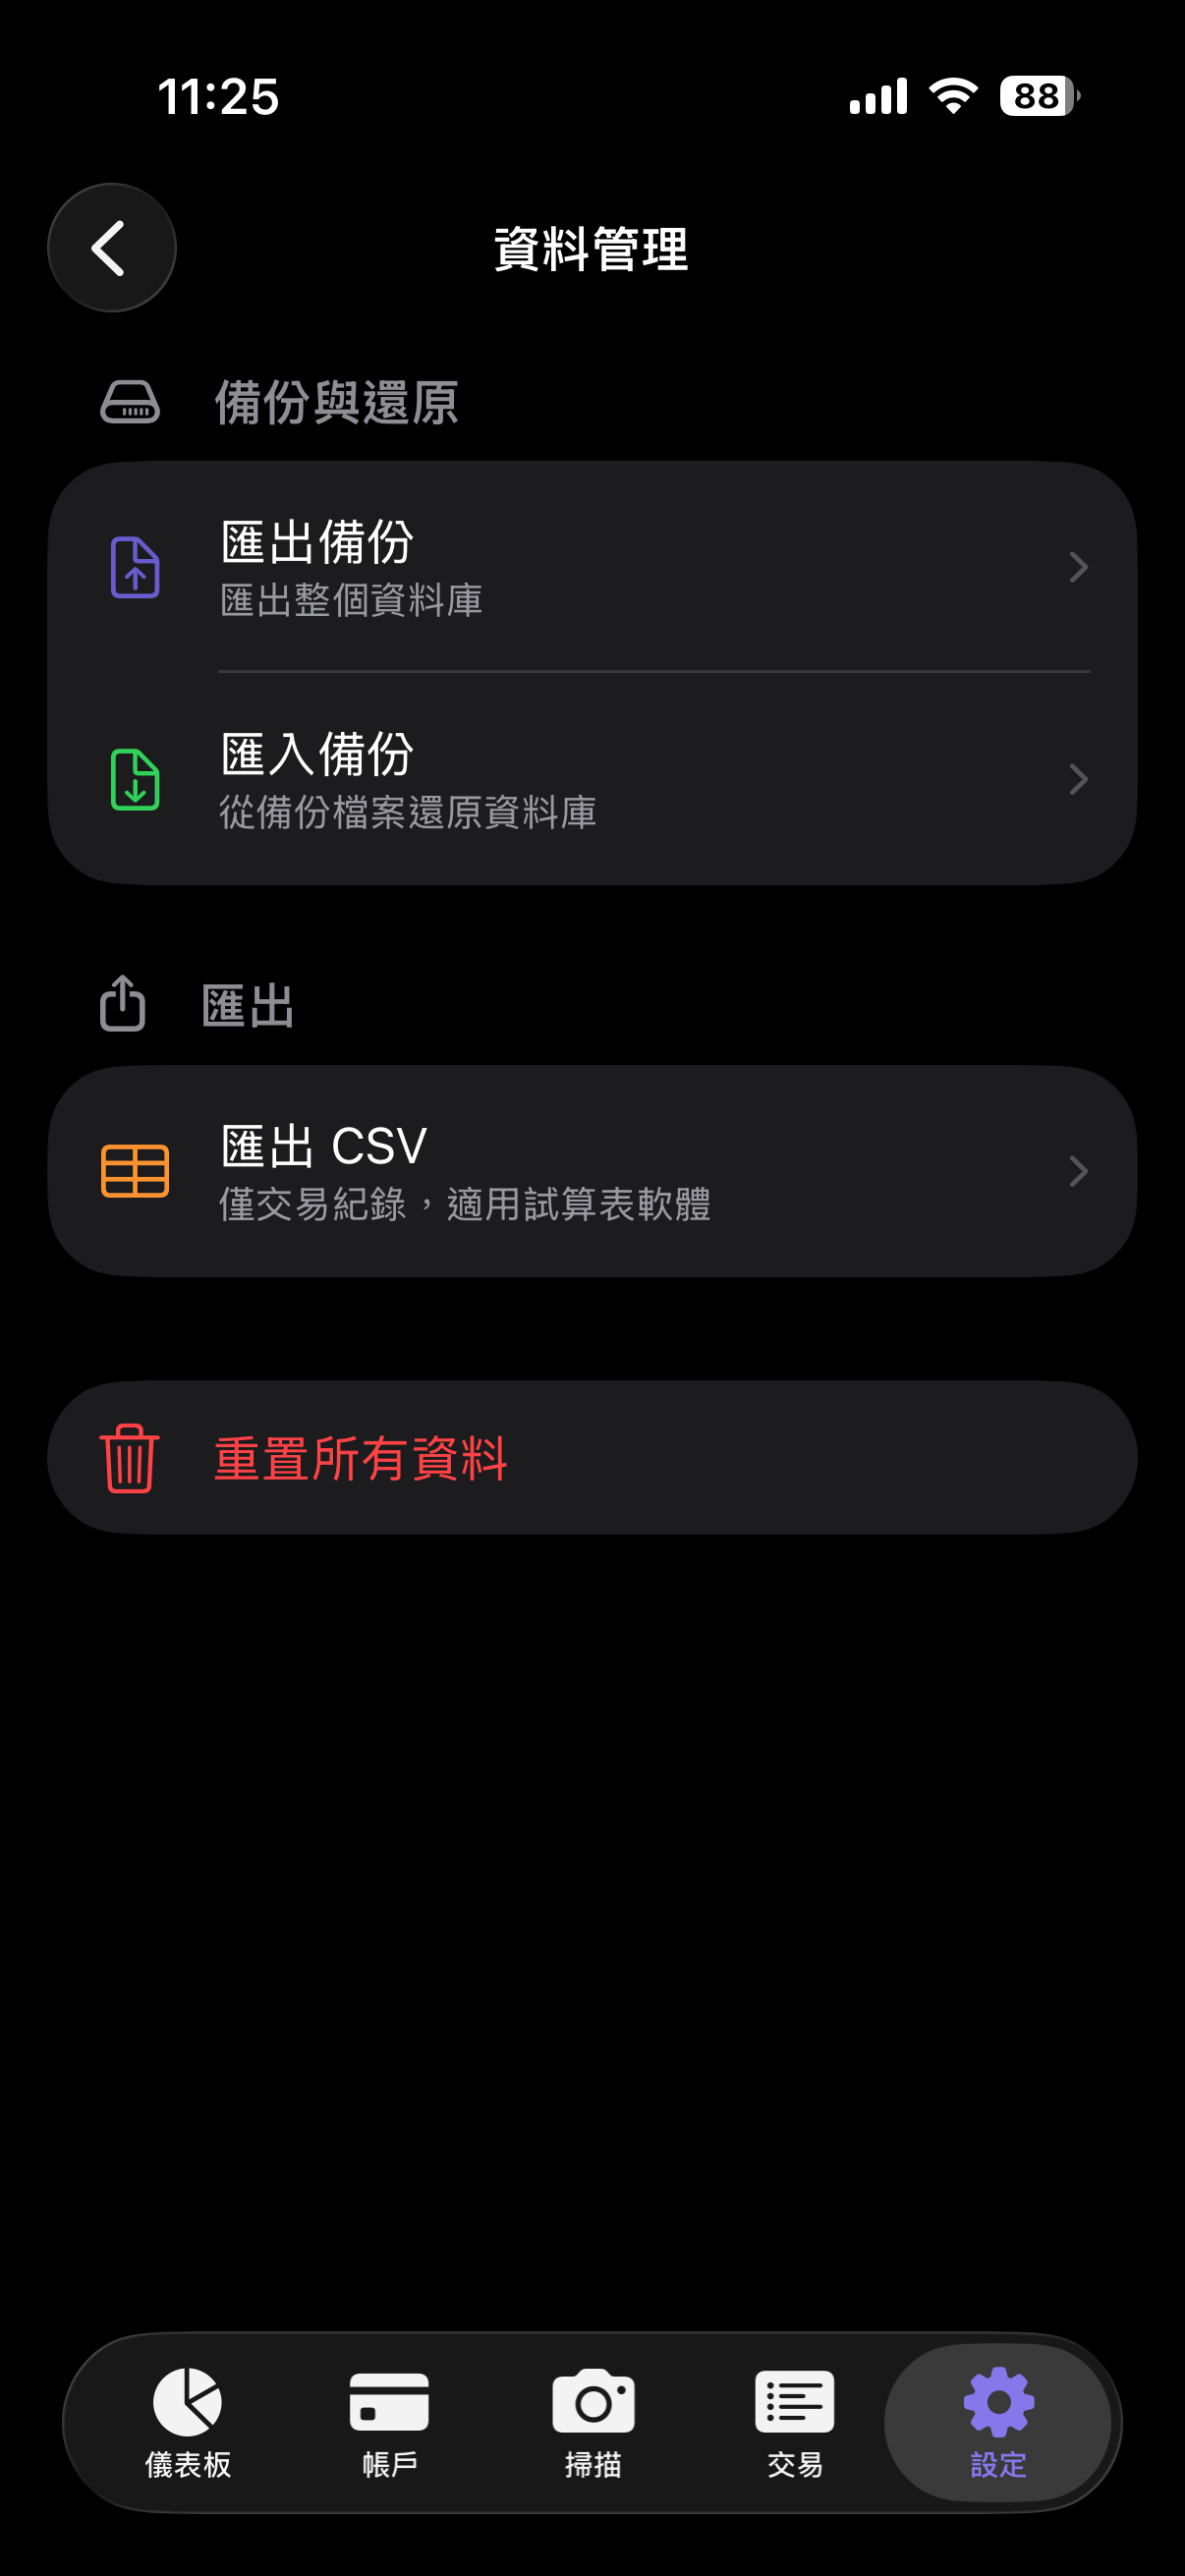
In Kakei AI, go to Settings → Data Management → Import Backup.
Note: importing will replace your existing data — make sure you’re ready before proceeding.
09
FAQ
If Apple Intelligence exists, why do you need a separate on-device AI?
The current Apple Intelligence system still has limitations — recognition accuracy isn’t consistent enough for financial data. I chose to integrate the most reliable lightweight on-device model available right now.
That said, I’m actively watching Apple’s progress. Apple Intelligence has a promising future, and we’ll upgrade when it’s ready.
Will the on-device AI and cloud AI keep getting updated?
Yes, absolutely! As open-source AI models improve and iPhone hardware advances, the on-device AI will be upgraded to be faster and more accurate.
As for cloud AI — the main consideration is that very few models currently offer high free daily usage limits for advanced tasks. Whenever a better free model becomes available, we’ll update to it promptly.
Why does the free version only support 4 accounts?
For most people, Cash / Bank / Credit card / Accounts receivable — four accounts covers everyday needs just fine.
When you start managing multiple cards, different banks, or investment and foreign currency assets, that’s when upgrading makes sense. More accounts, more advanced features, growing with your financial life.
What if banks start supporting automatic sync someday?
That would be great! If that day comes, this transitional app will have served its purpose.
In reality though, even in the US — where Open Banking is most mature — many regional banks and international accounts still can’t sync automatically. More importantly, a growing number of users simply don’t want to grant any financial app access to their accounts. For those people, fully On-Device AI bookkeeping — where data never leaves the device — will always be the right choice.
Other apps support automatic receipt import. Why don't you?
Automatic receipt scanning sounds convenient, but it has one critical flaw: you can’t tell which account was charged.
In real life, it’s common to pay with your credit card but store the receipt under your partner’s account. By reading bank statements and credit card screenshots directly, the app can accurately track the true flow of money across all your accounts — without any confusion.
Why doesn't the investment account show live stock prices?
Many people check daily gains and losses, but this app focuses on the bigger picture — your overall assets and long-term returns.
We help you track your current net worth and annualized return (XIRR), so you can see the long-term results clearly instead of being swayed by short-term fluctuations.